Olympus Stylus Verve Stylus Verve Advanced Manual (English) - Page 173
Green and red lamps and indicators
 |
UPC - 050332149700
View all Olympus Stylus Verve manuals
Add to My Manuals
Save this manual to your list of manuals |
Page 173 highlights
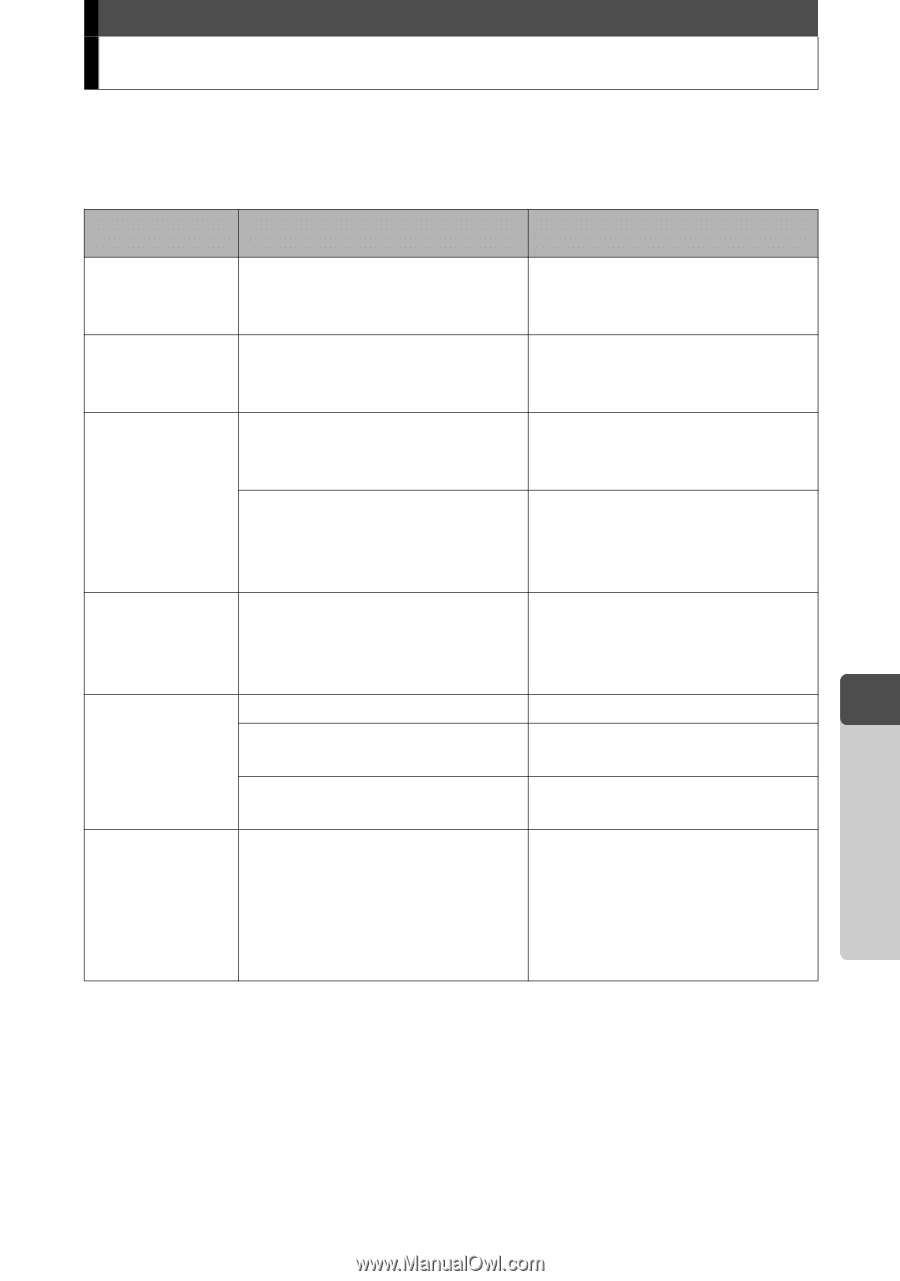
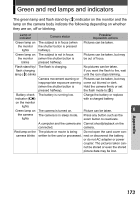
Green and red lamps and indicators The green lamp and flash stand-by (#) indicator on the monitor and the lamp on the camera body indicate the following depending on whether they are on, off or blinking. Lamp or indicator Camera status Possible/ Impossible actions Green lamp on The subject is in focus (when the monitor the shutter button is pressed Pictures can be taken. lights halfway). Green lamp on The subject is not in focus the monitor (when the shutter button is Pictures can be taken, but may be out of focus. blinks pressed halfway). Flash stand-by/ The flash is charging. flash charging lamp (#) blinks No pictures can be taken. If you want the flash to fire, wait until the icon stops blinking. Camera movement warning or Pictures can be taken, but may inappropriate exposure warning come out blurred or dark. (when the shutter button is pressed halfway). Hold the camera firmly or set the flash mode to [#]. Battery check The battery is running low. Charge the battery or replace indicator (f) with a charged battery. on the monitor lights Green lamp on The camera is turned on. Picture can be taken. 6 the camera The camera is in sleep mode. Press any button such as the lights zoom button to reactivate. A computer and the camera are Cannot shoot/playback on the connected. camera. Red lamp on the The picture or movie is being Do not open the card cover con- camera blinks written to the card or processed. nect or disconnect the battery, or do not AC adapter or power coupler. The pictures taken can- not be stored or even the stored picture data may be lost. Appendix 173
-
 1
1 -
2
-
3
-
4
-
5
-
6
-
7
-
8
-
9
-
10
-
11
-
12
-
13
-
14
-
15
-
16
-
17
-
18
-
19
-
20
-
21
-
22
-
23
-
24
-
25
-
26
-
27
-
28
-
29
-
30
-
31
-
32
-
33
-
34
-
35
-
36
-
37
-
38
-
39
-
40
-
41
-
42
-
43
-
44
-
45
-
46
-
47
-
48
-
49
-
50
-
51
-
52
-
53
-
54
-
55
-
56
-
57
-
58
-
59
-
60
-
61
-
62
-
63
-
64
-
65
-
66
-
67
-
68
-
69
-
70
-
71
-
72
-
73
-
74
-
75
-
76
-
77
-
78
-
79
-
80
-
81
-
82
-
83
-
84
-
85
-
86
-
87
-
88
-
89
-
90
-
91
-
92
-
93
-
94
-
95
-
96
-
97
-
98
-
99
-
100
-
101
-
102
-
103
-
104
-
105
-
106
-
107
-
108
-
109
-
110
-
111
-
112
-
113
-
114
-
115
-
116
-
117
-
118
-
119
-
120
-
121
-
122
-
123
-
124
-
125
-
126
-
127
-
128
-
129
-
130
-
131
-
132
-
133
-
134
-
135
-
136
-
137
-
138
-
139
-
140
-
141
-
142
-
143
-
144
-
145
-
146
-
147
-
148
-
149
-
150
-
151
-
152
-
153
-
154
-
155
-
156
-
157
-
158
-
159
-
160
-
161
-
162
-
163
-
164
-
165
-
166
-
167
-
 168
168 -
 169
169 -
 170
170 -
 171
171 -
 172
172 -
 173
173 -
 174
174 -
 175
175 -
 176
176 -
 177
177 -
 178
178 -
179
-
180
-
181
-
182
-
183
-
184
-
185
-
186
-
187
-
188
-
189
-
190
-
191
-
192
 |
 |