Olympus Tough 6000 STYLUS TOUGH-6000 Instruction Manual (English) - Page 52
Follow Steps 1 and 2
 |
UPC - 689466111675
View all Olympus Tough 6000 manuals
Add to My Manuals
Save this manual to your list of manuals |
Page 52 highlights
3 Use AB to select [
-
 1
1 -
2
-
3
-
4
-
5
-
6
-
7
-
8
-
9
-
10
-
11
-
12
-
13
-
14
-
15
-
16
-
17
-
18
-
19
-
20
-
21
-
22
-
23
-
24
-
25
-
26
-
27
-
28
-
29
-
30
-
31
-
32
-
33
-
34
-
35
-
36
-
37
-
38
-
39
-
40
-
41
-
42
-
43
-
44
-
45
-
46
-
 47
47 -
 48
48 -
 49
49 -
 50
50 -
 51
51 -
 52
52 -
 53
53 -
 54
54 -
 55
55 -
 56
56 -
 57
57 -
58
-
59
-
60
-
61
-
62
-
63
-
64
-
65
-
66
-
67
-
68
-
69
-
70
-
71
-
72
-
73
-
74
-
75
-
76
-
77
-
78
-
79
-
80
-
81
-
82
-
83
-
84
-
85
-
86
 |
 |

52
EN
3
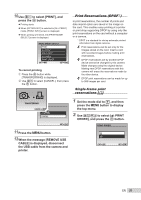
Use
AB
to select [
<
], and press
the
o
button.
x
10
M
10
M
2009.08.26
2009.08.26
12:30
12:30
100-0004
100-0004
4
0
N
ORM
N
ORM
SET
OK
4
Use
CD
to select the image for
print reservation. Use
AB
to select
the quantity. Press the
o
button.
SET
OK
MENU
BACK
DATE
TIME
NO
X
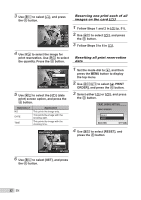
5
Use
AB
to select the [
X
] (date
print) screen option, and press the
o
button.
Submenu 2
Application
NO
This prints the image only.
DATE
This prints the image with the
shooting date.
TIME
This prints the image with the
shooting time.
OK
SET
BACK
MENU
PRINT ORDER
SET
CANCEL
1(
1)
1(
1)
6
Use
AB
to select [SET], and press
the
o
button.
Reserving one print each of all
images on the card [
U
]
1
Follow Steps 1 and 2 in [
<
] (p. 51).
2
Use
AB
to select [
U
], and press
the
o
button.
3
Follow Steps 5 to 6 in [
<
].
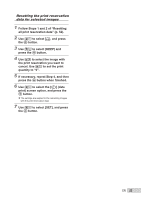
Resetting all print reservation
data
1
Set the mode dial to
q
, and then
press the
m
button to display
the top menu.
2
Use
ABCD
to select [
L
PRINT
ORDER], and press the
o
button.
3
Select either [
<
] or [
U
], and press
the
o
button.
OK
SET
BACK
MENU
PRINT ORDER SETTING
PRINT ORDERED
RESET
KEEP
4
Use
AB
to select [RESET], and
press the
o
button.