Olympus WS-321M WS-331M Instruction Manual (English) - Page 46
Connecting to Your PC
 |
UPC - 050332165168
View all Olympus WS-321M manuals
Add to My Manuals
Save this manual to your list of manuals |
Page 46 highlights
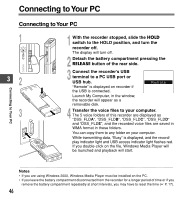
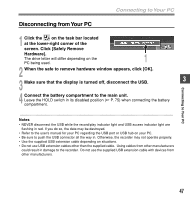
Connecting to Your PC Connecting to Your PC Connecting to Your PC 1 32 3 1 With the recorder stopped, slide the HOLD switch to the HOLD position, and turn the recorder off. The display will turn off. 2 Detach the battery compartment pressing the RELEASE button of the rear side. 3 Connect the recorder's USB terminal to a PC USB port or USB hub. "Remote" is displayed on recorder if the USB is connected. Remote Launch My Computer, in the window, the recorder will appear as a removable disk. 4 Transfer the voice files to your computer. The 5 voice folders of this recorder are displayed as "DSS_FLDA", "DSS_FLDB", "DSS_FLDC", "DSS_FLDD" and "DSS_FLDE", and the recorded voice files are saved in WMA format in these folders. You can copy them to any folder on your computer. While transmitting data, "Busy" is displayed, and the record/ play indicator light and USB access indicator light flashes red. If you double-click on the file, Windows Media Player will be launched and playback will start. ...Notes • If you are using Windows 2000, Windows Media Player must be installed on the PC. • If you leave the battery compartment disconnected from the recorder for a longer period of time or if you remove the battery compartment repeatedly at short intervals, you may have to reset the time (☞ P. 17). 46
-
 1
1 -
2
-
3
-
4
-
5
-
6
-
7
-
8
-
9
-
10
-
11
-
12
-
13
-
14
-
15
-
16
-
17
-
18
-
19
-
20
-
21
-
22
-
23
-
24
-
25
-
26
-
27
-
28
-
29
-
30
-
31
-
32
-
33
-
34
-
35
-
36
-
37
-
38
-
39
-
40
-
 41
41 -
 42
42 -
 43
43 -
 44
44 -
 45
45 -
 46
46 -
 47
47 -
 48
48 -
 49
49 -
 50
50 -
 51
51 -
52
-
53
-
54
-
55
-
56
-
57
-
58
-
59
-
60
-
61
-
62
-
63
-
64
-
65
-
66
-
67
-
68
-
69
-
70
-
71
-
72
-
73
-
74
-
75
-
76
-
77
-
78
-
79
-
80
-
81
-
82
-
83
-
84
-
85
-
86
-
87
-
88
-
89
-
90
-
91
-
92
-
93
-
94
-
95
-
96
-
97
-
98
-
99
-
100
-
101
-
102
 |
 |
