Olympus WS-802 WS-802 Detailed Instructions (English) - Page 29
About recording
 |
View all Olympus WS-802 manuals
Add to My Manuals
Save this manual to your list of manuals |
Page 29 highlights
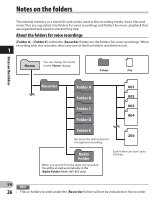
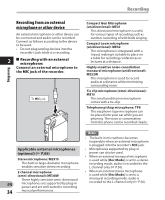
About recording Recording Before starting recording, select a folder among [&] to [*]. These five folders can be used to categorize recorded information according to type; for example, Folder [&] might be used to store private information, while Folder ['] might be dedicated to holding business information. STOP (4) button REC (s) button • [Rec Mode] cannot be changed in recording standby mode or while recording. Configure this while the recorder is stopped (☞ P.56). • The proper position of the built-in stereo microphone for performing stereo recording is over the display. If the microphone is below the display during recording, proper stereo 2 recording is impossible because the original sound will be recorded in reverse phase. 3 Press the STOP (4) button to stop recording. • [L] appears on the display. Recording 1 Select a recording folder (☞ P.26). 2 Press the REC (s) button to start recording. • The LED indicator light turns on and [K] appears on the display. • Turn the microphone in the direction of the source to be recorded. a b c d e a Recording mode indicator b Elapsed recording time c Remaining memory bar indicator d Remaining recording time e Level meter (changes according to the recording level and recording function settings) f f File length Notes • To ensure that you do not lose the beginning of the recording, verify that the LED indicator light or the mode indicator is lit on the display. • When the remaining recording time is less than 60 seconds, the LED indicator light starts flashing. When the remaining EN recording time drops to 30 and then 10 seconds, the light flashes faster. 29
-
 1
1 -
2
-
3
-
4
-
5
-
6
-
7
-
8
-
9
-
10
-
11
-
12
-
13
-
14
-
15
-
16
-
17
-
18
-
19
-
20
-
21
-
22
-
23
-
 24
24 -
 25
25 -
 26
26 -
 27
27 -
 28
28 -
 29
29 -
 30
30 -
 31
31 -
 32
32 -
 33
33 -
 34
34 -
35
-
36
-
37
-
38
-
39
-
40
-
41
-
42
-
43
-
44
-
45
-
46
-
47
-
48
-
49
-
50
-
51
-
52
-
53
-
54
-
55
-
56
-
57
-
58
-
59
-
60
-
61
-
62
-
63
-
64
-
65
-
66
-
67
-
68
-
69
-
70
-
71
-
72
-
73
-
74
-
75
-
76
-
77
-
78
-
79
-
80
-
81
-
82
-
83
-
84
-
85
-
86
-
87
-
88
-
89
-
90
-
91
-
92
-
93
-
94
-
95
 |
 |
