Onkyo DV-SP800 Instruction Manual - Page 15
Connecting to a TV
 |
View all Onkyo DV-SP800 manuals
Add to My Manuals
Save this manual to your list of manuals |
Page 15 highlights
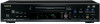
Connecting Connecting to a TV Before connecting • Refer also to the instruction manual of the TV. • When you connect the DVD Player to the TV, be sure to turn off the power and unplug both units from the mains before making any connections. • Connect the DVD Player to the TV directly. If you connect the DVD Player to a VCR, TV/VCR combination, or video selector, the playback picture may be distorted as DVD videos are copy protected. • Connect the plugs securely. Incomplete Insert completely Using the supplied audio/video connection cable Using the supplied audio/video cable, make audio connections from the ANALOG OUTPUT CH 1 or CH 2 L and R jacks to the corresponding audio input jacks on the TV. In the same manner, make video connection from the VIDEO OUTPUT VIDEO jack to the corresponding video input jack on the TV. By making connections to a stereo system, you can improve the quality of the sound. Using an audio cable (not supplied), make audio connections from the ANALOG OUTPUT CH 1 or CH 2 L and R jacks to the corresponding jacks on the stereo component. Note Be sure to match the colors of the plugs on the cable with the corresponding jacks on the DVD Player and the TV: yellow for video, red for R (right) audio and white for L (left) audio. If the TV audio is monaural, leave the red plug disconnected. Be sure to set the TV Aspect after connection using the Setup Navigator explained in "Setting Up the Player" starting on page 21 or the function setting menu explained in "Adjusting Audio and Video Settings" starting on page 46. Stereo audio/video connection cable To audio and video input Video (Yellow) L (White) R (Red) : Signal flow VIDEO OUTPUT COMPONENT Y PB PR S VIDEO VIDEO CH 1 L ANALOG OUTPUT R CH 2 FRONT SURR 1 CENTER SURR 2 SUB WOOFER L SURR 1 1+2 R DIGITAL OUTPUT OPTICAL COAXIAL REMOTE CONTROL SACD & DVD AUDIO/VIDEO PLAYER MODEL NO. DV-SP800 AC INLET DO NOT connect the mains lead at this time. Notes • Connect the player's video output directly to the television. • Since the player is compatible to analog copy protection there may be cases when recordings from the deck may be distorted during playback. • Progressive signals are not output from the players video or S1/S2 video output jack. 15
-
 1
1 -
2
-
3
-
4
-
5
-
6
-
7
-
8
-
9
-
 10
10 -
 11
11 -
 12
12 -
 13
13 -
 14
14 -
 15
15 -
 16
16 -
 17
17 -
 18
18 -
 19
19 -
 20
20 -
21
-
22
-
23
-
24
-
25
-
26
-
27
-
28
-
29
-
30
-
31
-
32
-
33
-
34
-
35
-
36
-
37
-
38
-
39
-
40
-
41
-
42
-
43
-
44
-
45
-
46
-
47
-
48
-
49
-
50
-
51
-
52
-
53
-
54
-
55
-
56
-
57
-
58
-
59
-
60
-
61
-
62
-
63
-
64
-
65
-
66
-
67
-
68
-
69
-
70
-
71
-
72
-
73
-
74
-
75
-
76
 |
 |
