Onkyo TX-NR646 Basics Guide - Page 6
Step 1
 |
View all Onkyo TX-NR646 manuals
Add to My Manuals
Save this manual to your list of manuals |
Page 6 highlights
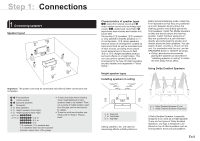
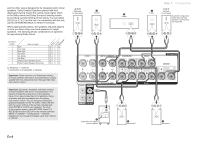
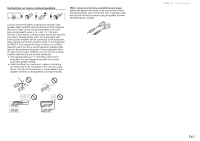
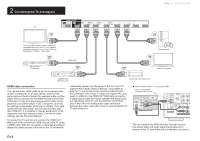
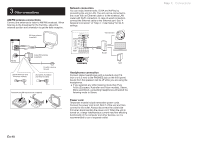
and the other type is designed to be integrated with normal speakers. Dolby Enabled Speakers placed with their diaphragms facing toward the ceiling create higher effect in the Dolby Atmos and Dolby Surround listening modes by providing sounds echoing off the ceiling. You can select (g)(h) or (i)(j) on the unit. For connection with the unit, use the SPEAKERS BACK or HEIGHT terminals. When playing Dolby Atmos, the speakers required depend on how you have setup your back speakers or height speakers. The following shows combinations of speakers for reproducing Dolby Atmos. Connection pattern 1 2 3 4 5 6 7 8 Back or Height Back Front High Rear High Top Front Top Middle Top Rear Dolby Enabled Speaker (Front) Dolby Enabled Speaker (Surround) : Required, : Optional Connection of a subwoofer is optional. Front CenterSurround Important: (North American and Taiwanese models) Connect speakers with 6 Ω to 16 Ω impedance. Using a speaker with less impedance than the supported value may result in failure. Important: (European, Australian and Asian models) Connect speakers with 4 Ω to 16 Ω impedance. You have to change the setting if any of the speakers have 4 Ω or more to less than 6 Ω impedance. Using a speaker with less impedance than the setting may result in failure. You can set up by viewing the guidance displayed on the TV screen. Select the item with the cursor buttons of the remote controller and press ENTER to confirm your selection. To return to the previous screen, press RETURN. Press RECEIVER and then SETUP on the remote controller. Select "2. Speaker" - "Configuration" - "Speaker Impedance" and change the default value from "6ohms" to "4ohms". 8FH Right back Or right height # Front R ' Subwoofer with built-in power amplifier En-6 $ Center " Front L Step 1: Connections 79G Left back Or left height A speaker configuration where only one back speaker is connected is not supported. & Surround R % Surround L
-
 1
1 -
 2
2 -
 3
3 -
 4
4 -
 5
5 -
 6
6 -
 7
7 -
 8
8 -
 9
9 -
 10
10 -
 11
11 -
 12
12 -
13
-
14
-
15
-
16
-
17
-
18
-
19
-
20
-
21
-
22
-
23
-
24
-
25
-
26
-
27
-
28
-
29
-
30
-
31
-
32
 |
 |
