Onkyo TX-RZ1100 User Manual - Page 103
Troubleshooting
 |
View all Onkyo TX-RZ1100 manuals
Add to My Manuals
Save this manual to your list of manuals |
Page 103 highlights
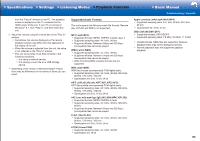
>>Specifications >>Settings >>Listening Modes >>Playback Function >>Basic Manual Troubleshooting | Appendix Troubleshooting Before starting the procedure Problems may be solved by simply turning the power on/ off or disconnecting/connecting the power cord, which is easier than working on the connection, setting and operating procedure. Try the simple measures on both the unit and the connected device. If the problem is that the video or audio is not output or the HDMI linked operation does not work, disconnecting/connecting the HDMI cable may solve it. When reconnecting, be careful not to wind the HDMI cable since if wound the HDMI cable may not fit well. After reconnecting, turn off and on the unit and the connected device. • This unit contains a microPC for signal processing and control functions. In very rare situations, severe interference, noise from an external source, or static electricity may cause it to lockup. In the unlikely event that this happens, unplug the power cord from the wall outlet, wait at least 2 minutes, and then plug it back in. • Our company is not responsible for reparations for damages (such as CD rental fees) due to unsuccessful recordings caused by the unit's malfunction. Before you record important data, make sure that the material will be recorded correctly. Power ˙ Cannot turn on the unit • Make sure that the power cord is properly plugged into the wall outlet. • Unplug the power cord from the wall outlet, wait 2 minutes or more, then plug it in again. ˙ The unit turns off unexpectedly • The unit automatically switches to standby when the "Hardware" - "Power Management" - "Auto Standby" setting in the Setup menu functions. • (Models with built-in amplifiers only) If you play at high volumes or allow input of excessive bass, the protection circuits in the amplifier can be tripped which may suddenly turn the unit off. Try the following if this occurs. - Reduce the volume - Select under 100 Hz for each of the speakers in "Speaker" - "Equalizer Settings" in the Setup menu, and reduce the volume compared to the current setting. - In "Speaker" - "Crossover" in the Setup menu, set "Front" to the crossover frequency value other than "Full Band" or set "Front" to "Full Band" and set "Double Bass" to "On" • (Models with built-in amplifiers only) If the power turns off and indicators on the front panel continually blink, or the following error messages appear on the display, there may have been a malfunction with the amplifier or the protection circuit may have tripped. - If "CHECK SP WIRE" is displayed: The wires in the speaker cables may have touch the rear panel or other wires. Twist the wires again properly and make sure they do not stick out of the speaker terminals when connecting. - If "FAN STOP" is displayed: The internal cooling fan has malfunctioned. Unplug the power cord from the wall outlet immediately and contact the dealer or our company's support. - If "AMP OVERHEAT" is displayed: The temperature inside the unit has exceeded the admissible value. Make sure the unit has plenty of space for ventilation around it, wait for the unit to cool down sufficiently, and then try turning it on again. - If "AMP ERR" is displayed: It is possible that the amplifier circuits in the unit have malfunctioned. Wait for at least a minute and then turn the unit on again. If the same symptoms such as being unable to turn the unit on happen repeatedly, unplug the power cord from the wall outlet immediately and contact the dealer or our company's support. WARNING: If smoke, smell or abnormal noise is produced by the unit, unplug the power cord from the wall outlet immediately and contact the dealer or our company's support. 67
-
 1
1 -
2
-
3
-
4
-
5
-
6
-
7
-
8
-
9
-
10
-
11
-
12
-
13
-
14
-
15
-
16
-
17
-
18
-
19
-
20
-
21
-
22
-
23
-
24
-
25
-
26
-
27
-
28
-
29
-
30
-
31
-
32
-
33
-
34
-
35
-
36
-
37
-
38
-
39
-
40
-
41
-
42
-
43
-
44
-
45
-
46
-
47
-
48
-
49
-
50
-
51
-
52
-
53
-
54
-
55
-
56
-
57
-
58
-
59
-
60
-
61
-
62
-
63
-
64
-
65
-
66
-
67
-
68
-
69
-
70
-
71
-
72
-
73
-
74
-
75
-
76
-
77
-
78
-
79
-
80
-
81
-
82
-
83
-
84
-
85
-
86
-
87
-
88
-
89
-
90
-
91
-
92
-
93
-
94
-
95
-
96
-
97
-
 98
98 -
 99
99 -
 100
100 -
 101
101 -
 102
102 -
 103
103 -
 104
104 -
 105
105 -
 106
106 -
 107
107 -
 108
108 -
109
-
110
 |
 |
