Onkyo TX-RZ3100 User Manual - Page 26
Others
 |
View all Onkyo TX-RZ3100 manuals
Add to My Manuals
Save this manual to your list of manuals |
Page 26 highlights
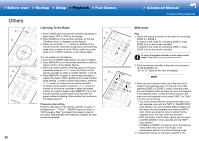
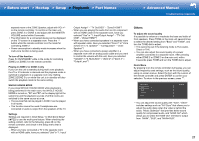
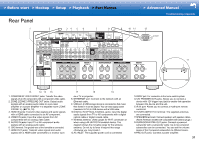
> Before start > Hookup > Setup > Playback > Part Names Others a b c d e Listening To the Radio 1. Press TUNER (a) on the remote controller repeatedly to select either "AM" or "FM" on the display. 2. Press MODE (c) on the remote controller, so that the "TunMode: Auto" is displayed on the display. 3. When you press the # / $ cursor (b) buttons on the remote controller, automatic tuning starts, and searching stops when a station is found. When tuned into a radio station, the "TUNED" indicator on the display lights. You can preset up to 40 stations. 1. Tune into the AM/FM radio station you want to register. 2. Press MEMORY (d) on the remote controller so that the preset number on the display flashes. 3. While the preset number is flashing (about 8 seconds), repeatedly press the " / ! cursor (b) buttons on the remote controller to select a number between 1 and 40. 4. Press MEMORY (d) again on the remote controller to register the station. When registered, the preset number stops flashing. To select a preset radio station, press the " / ! cursor (b) buttons on the remote controller. 0 To delete a preset station, press the " / ! cursor (b) buttons on the remote controller to select the preset number you want to delete, press MEMORY (d) on the remote controller and then press CLR (e) while the preset number is flashing. When deleted, the number on the display goes off. Frequency step setting Press the button on the remote controller to select "7. Miscellaneous" - "Tuner" - "AM/FM Frequency Step" or "AM Frequency Step" and select the frequency step for your area. Note that when this setting is changed, all radio presets are deleted. c a b d e 26 > Advanced Manual Troubleshooting | Appendix Multi-zone Play 1. Switch the remote controller to the mode for controlling ZONE 2 or ZONE 3. To switch to the mode for controlling ZONE 2, press ZONE 2 (a) on the remote controller. To switch to the mode for controlling ZONE 3, press ZONE 3 (b) on the remote controller. To return the remote controller to main room control mode: Press MAIN (c) on the remote controller. 2. Point the remote controller at the main unit and press Í ON/STANDBY (d). "Z2" or "Z3" lights on the main unit display. 3. Press the input selector button (e) of the input to be played in the separate room. On the main unit, after pressing ZONE 2 or ZONE 3, within 8 seconds press the input selector button to select the input to be played in the separate room. To play the same source in the main room and separate room, press ZONE 2 or ZONE 3 on the main unit twice. 0 You cannot select different inputs for the main room and separate room with the "NET" or "BLUETOOTH" input selector. You cannot select different stations for the main room and separate room with the AM/FM radio. When you select an input or station for the separate room, the main room also switches. 0 DSD and Dolby TrueHD audio signals are not output to ZONE 2/ZONE 3 when selected with the "NET" input selector. 0 If ZONE 2 or ZONE 3 is turned on when the listening mode of the main room is Pure Audio, it will automatically switch to the Direct listening mode. 4. To adjust the volume on the power amplifier in the
-
 1
1 -
2
-
3
-
4
-
5
-
6
-
7
-
8
-
9
-
10
-
11
-
12
-
13
-
14
-
15
-
16
-
17
-
18
-
19
-
20
-
 21
21 -
 22
22 -
 23
23 -
 24
24 -
 25
25 -
 26
26 -
 27
27 -
 28
28 -
 29
29 -
 30
30 -
 31
31 -
32
-
33
-
34
-
35
-
36
-
37
-
38
-
39
-
40
-
41
-
42
-
43
-
44
-
45
-
46
-
47
-
48
-
49
-
50
-
51
-
52
-
53
-
54
-
55
-
56
-
57
-
58
-
59
-
60
-
61
-
62
-
63
-
64
-
65
-
66
-
67
-
68
-
69
-
70
-
71
-
72
-
73
-
74
-
75
-
76
-
77
-
78
-
79
-
80
-
81
-
82
-
83
-
84
-
85
-
86
-
87
-
88
-
89
-
90
-
91
-
92
-
93
-
94
-
95
-
96
-
97
-
98
-
99
-
100
-
101
-
102
-
103
-
104
-
105
-
106
-
107
-
108
-
109
-
110
 |
 |
