Onkyo TX-RZ830 Owners Manual - English - Page 144
Bluetooth, Power Management
 |
View all Onkyo TX-RZ830 manuals
Add to My Manuals
Save this manual to your list of manuals |
Page 144 highlights
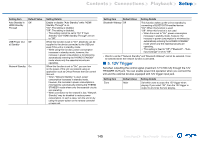
Contents ≫ Connections ≫ Playback ≫ Setup ≫ „„3. Bluetooth Change the settings for the Bluetooth function. Setting Item Bluetooth Default Value On Auto Input On Change Auto Reconnect On Pairing - Information Setting Details Select whether or not to use the BLUETOOTH function. "On": Enables connection with a BLUETOOTHenabled device by using the BLUETOOTH function. Select "On" also when making various BLUETOOTH settings. "Off": When not using the BLUETOOTH function The input of the unit can be automatically switched to "BLUETOOTH" when connection is made from a BLUETOOTH-enabled device to the unit. "On": The input is automatically set to "BLUETOOTH" when a BLUETOOTH-enabled device is connected. "Off": The function is disabled. • If the input is not switched automatically, set this to "Off", and change the input manually. This function automatically reconnects to the BLUETOOTH-enabled device connected last when you change the input to "BLUETOOTH". "On": When this function is used "Off": When this function is not used • This may not work with some BLUETOOTH- enabled devices. You can initialize the pairing information stored on this unit. Pressing ENTER when "Clear" is displayed initializes the pairing information stored on this unit. • This function does not initialize the pairing information on the BLUETOOTH-enabled device. When pairing the unit again with the device, be sure to clear the pairing information on the BLUETOOTH-enabled device beforehand. For information on how to clear the pairing information, refer to the instruction manual of the BLUETOOTH-enabled device. Setting Item Device Status Default Value - - Setting Details Displays the name of the BLUETOOTH-enabled device connected to the unit. • The name is not displayed when "Status" is "Ready" and "Pairing". Displays the status of the BLUETOOTH-enabled device connected to the unit. "Ready": Not paired "Pairing": Paired "Connected": Successfully connected • Wait for a while if "Bluetooth" cannot be selected. It can be selected when the BLUETOOTH function is activated. „„4. Power Management Change the settings for the power-save function. Setting Item Sleep Timer Auto Standby Default Value Off On/Off Setting Details You can allow the unit to enter standby automatically when the specified time elapses. Select a value from "30 minutes", "60 minutes" and "90 minutes". "Off": The unit does not automatically enter standby mode. This setting allows the unit to enter standby mode automatically after 20 minutes of inactivity without any video or audio input. (When "USB Power Out at Standby" or "Network Standby" is enabled, the unit enters the HYBRID STANDBY mode which minimizes the increase in power consumption.) "On": The unit automatically enters standby mode ("AUTO STBY" lights up). "Off": The unit does not automatically enter standby mode. • "Auto Standby" is displayed on the main unit's display and TV screen 30 seconds before entering standby mode. • "Auto Standby" does not work when Zone 2/ Zone 3 is active. • Default values vary depending on the regions. 144 Front Panel≫ Rear Panel≫ Remote≫
-
 1
1 -
2
-
3
-
4
-
5
-
6
-
7
-
8
-
9
-
10
-
11
-
12
-
13
-
14
-
15
-
16
-
17
-
18
-
19
-
20
-
21
-
22
-
23
-
24
-
25
-
26
-
27
-
28
-
29
-
30
-
31
-
32
-
33
-
34
-
35
-
36
-
37
-
38
-
39
-
40
-
41
-
42
-
43
-
44
-
45
-
46
-
47
-
48
-
49
-
50
-
51
-
52
-
53
-
54
-
55
-
56
-
57
-
58
-
59
-
60
-
61
-
62
-
63
-
64
-
65
-
66
-
67
-
68
-
69
-
70
-
71
-
72
-
73
-
74
-
75
-
76
-
77
-
78
-
79
-
80
-
81
-
82
-
83
-
84
-
85
-
86
-
87
-
88
-
89
-
90
-
91
-
92
-
93
-
94
-
95
-
96
-
97
-
98
-
99
-
100
-
101
-
102
-
103
-
104
-
105
-
106
-
107
-
108
-
109
-
110
-
111
-
112
-
113
-
114
-
115
-
116
-
117
-
118
-
119
-
120
-
121
-
122
-
123
-
124
-
125
-
126
-
127
-
128
-
129
-
130
-
131
-
132
-
133
-
134
-
135
-
136
-
137
-
138
-
 139
139 -
 140
140 -
 141
141 -
 142
142 -
 143
143 -
 144
144 -
 145
145 -
 146
146 -
 147
147 -
 148
148 -
 149
149 -
150
-
151
-
152
-
153
-
154
-
155
-
156
-
157
-
158
-
159
-
160
-
161
-
162
-
163
-
164
-
165
-
166
-
167
-
168
-
169
-
170
-
171
-
172
-
173
-
174
-
175
 |
 |
