Onkyo TX-RZ830 Owners Manual - English - Page 150
Web Setup
 |
View all Onkyo TX-RZ830 manuals
Add to My Manuals
Save this manual to your list of manuals |
Page 150 highlights
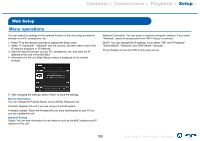
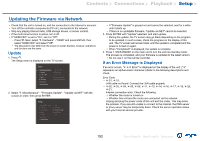
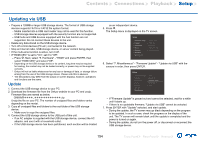
Contents ≫ Connections ≫ Playback ≫ Setup ≫ Web Setup Menu operations You can make the settings for the network function of this unit using an Internet browser on a PC, smartphone, etc. 1. Press on the remote controller to display the Setup menu. 2. Select "5. Hardware" - "Network" with the cursors, and then take a note of the IP address displayed in "IP Address". 3. Start the Internet browser on your PC, smartphone, etc. and enter the IP address of this unit in the URL field. 4. Information for the unit (Web Setup screen) is displayed in the Internet browser. Network Connection: You can select a network connection method. If you select "Wireless", select an access point from "Wi-Fi Setup" to connect. DHCP: You can change DHCP settings. If you select "Off", set "IP Address", "Subnet Mask", "Gateway" and "DNS Server" manually. Proxy: Display and set the URL for the proxy server. 5. After changing the settings, select "Save" to save the settings. Device Information You can change the Friendly Name, set an AirPlay Password, etc. Control4: Register this unit if you are using a Control4 system. Firmware Update: Select the firmware file you have downloaded to your PC so you can update this unit. Network Setting Status: You can see information for the network such as the MAC address and IP address of this unit. 150 Front Panel≫ Rear Panel≫ Remote≫
-
 1
1 -
2
-
3
-
4
-
5
-
6
-
7
-
8
-
9
-
10
-
11
-
12
-
13
-
14
-
15
-
16
-
17
-
18
-
19
-
20
-
21
-
22
-
23
-
24
-
25
-
26
-
27
-
28
-
29
-
30
-
31
-
32
-
33
-
34
-
35
-
36
-
37
-
38
-
39
-
40
-
41
-
42
-
43
-
44
-
45
-
46
-
47
-
48
-
49
-
50
-
51
-
52
-
53
-
54
-
55
-
56
-
57
-
58
-
59
-
60
-
61
-
62
-
63
-
64
-
65
-
66
-
67
-
68
-
69
-
70
-
71
-
72
-
73
-
74
-
75
-
76
-
77
-
78
-
79
-
80
-
81
-
82
-
83
-
84
-
85
-
86
-
87
-
88
-
89
-
90
-
91
-
92
-
93
-
94
-
95
-
96
-
97
-
98
-
99
-
100
-
101
-
102
-
103
-
104
-
105
-
106
-
107
-
108
-
109
-
110
-
111
-
112
-
113
-
114
-
115
-
116
-
117
-
118
-
119
-
120
-
121
-
122
-
123
-
124
-
125
-
126
-
127
-
128
-
129
-
130
-
131
-
132
-
133
-
134
-
135
-
136
-
137
-
138
-
139
-
140
-
141
-
142
-
143
-
144
-
 145
145 -
 146
146 -
 147
147 -
 148
148 -
 149
149 -
 150
150 -
 151
151 -
 152
152 -
 153
153 -
 154
154 -
 155
155 -
156
-
157
-
158
-
159
-
160
-
161
-
162
-
163
-
164
-
165
-
166
-
167
-
168
-
169
-
170
-
171
-
172
-
173
-
174
-
175
 |
 |
