Onkyo TX SR875 Owner Manual - Page 21
Connecting Your Speakers, Number of speakers, Dipole speakers, Normal speakers, Speaker terminal - black
 |
UPC - 751398007668
View all Onkyo TX SR875 manuals
Add to My Manuals
Save this manual to your list of manuals |
Page 21 highlights
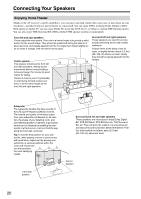
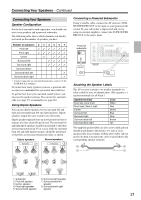
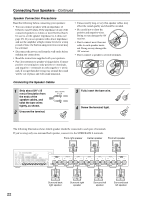
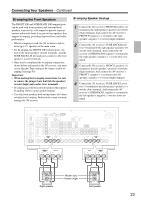
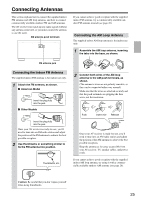
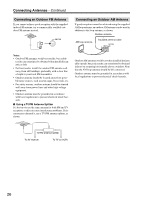
Connecting Your Speakers-Continued Connecting Your Speakers Speaker Configuration For the best surround-sound experience, you should connect seven speakers and a powered subwoofer. The following table shows which channels you should use based on the number of speakers you have. Number of speakers: 2 3 4 5 6 7 Front left Front right Center ✓ ✓✓✓ Surround left ✓✓✓✓ Surround right ✓✓✓✓ Surround back* ✓ Surround back left ✓ Surround back right ✓ * If you're using only one surround back speaker, connect it to the SURR BACK L terminals. No matter how many speakers you use, a powered subwoofer is recommended for a powerful and solid bass. To get the best from your surround-sound system, you must set the speaker settings. You can do this automatically (see page 55) or manually (see page 86). Using Dipole Speakers You can use dipole speakers for the surround left and right and surround back left and right speakers. Dipole speakers output the same sound in two directions. Dipole speakers typically have an arrow printed on them to indicate how they should be positioned. The surround left and right dipole speakers should be positioned so that their arrows point toward your TV or screen, while the surround back left and right dipolar speakers should be positioned so that their arrows point toward each other, as shown. Dipole speakers TV/screen 1 2 3 4 Normal speakers TV/screen 1 2 3 4 Connecting a Powered Subwoofer Using a suitable cable, connect the AV receiver's SUBWOOFER PRE OUT to the input on your powered subwoofer. If your subwoofer is unpowered and you're using an external amplifier, connect the SUBWOOFER PRE OUT to the amp's input. Powered subwoofer LINE INPUT LINE INPUT RS232 HDMI ASSIGNABLE IN 4 IN 3 IN 2 IN 1 OUT COMPONENT VIDEO ASSIGNABLE IN 3 IN 2 IN 1(DVD) MONITOR OUT Y REMOTE CB/PB CONTROL DIGITAL ASSIGNABLE COAXIAL IN 1 (DVD) CR/PR IN 2 (VCR/DVR) IN L IN OUT L AUX 1 GAME/TV CBL/SAT V VCR/DVR S IN IN IN IN OUT IN ANTENNA AM FM75 DVD MONITOR OUT V ZONE 2 OUT IR IN 12V TRIGGER OUT ZONE 2 S OUT IN FRONT CENTER SURR SURR BACK FRONT CENTER SURR SURR BACK ZONE 2 IN 3 (CBL/SAT) R R OPTICAL PHONO IN 1 CD TAPE AUX 1 GAME/TV CBL/SAT VCR/DVR DVD (GAME/TV) GND ZONE2 R SURR BACK R Bi-AMP FRONT R SURR R IN 2 (CD) OUT SUBWOOFER MULTI CH CENTER SURR L SUBWOOFER PRE OUT FRONT L PR SU FRONT R (BTL) FRONT L (BTL) SUBWOOFER PRE OUT Attaching the Speaker Labels The AV receiver's positive (+) speaker terminals are color-coded for ease of identification. (The negative (-) speaker terminals are all black.) Speaker terminal Front left, Zone 2 left Front right, Zone 2 right Center Surround left Surround right Surround back left Surround back right Color White Red Green Blue Gray Brown Tan The supplied speaker labels are also color-coded and you should attach them to the positive (+) side of each speaker cable in accordance with the above table. All you need to do then is to match the color of each label to the corresponding speaker terminal. 5 65 6 7 8 7 8 1. Subwoofer 2. Front left speaker 3. Center speaker 4. Front right speaker 5. Surround left speaker 6. Surround right speaker 7. Surround back left speaker 8. Surround back right speaker 21
-
 1
1 -
2
-
3
-
4
-
5
-
6
-
7
-
8
-
9
-
10
-
11
-
12
-
13
-
14
-
15
-
 16
16 -
 17
17 -
 18
18 -
 19
19 -
 20
20 -
 21
21 -
 22
22 -
 23
23 -
 24
24 -
 25
25 -
 26
26 -
27
-
28
-
29
-
30
-
31
-
32
-
33
-
34
-
35
-
36
-
37
-
38
-
39
-
40
-
41
-
42
-
43
-
44
-
45
-
46
-
47
-
48
-
49
-
50
-
51
-
52
-
53
-
54
-
55
-
56
-
57
-
58
-
59
-
60
-
61
-
62
-
63
-
64
-
65
-
66
-
67
-
68
-
69
-
70
-
71
-
72
-
73
-
74
-
75
-
76
-
77
-
78
-
79
-
80
-
81
-
82
-
83
-
84
-
85
-
86
-
87
-
88
-
89
-
90
-
91
-
92
-
93
-
94
-
95
-
96
-
97
-
98
-
99
-
100
-
101
-
102
-
103
-
104
-
105
-
106
-
107
-
108
-
109
-
110
-
111
-
112
-
113
-
114
-
115
-
116
-
117
-
118
-
119
-
120
 |
 |
