Optoma EP1690 User Manual - Page 34
Appendices - wxga
 |
UPC - 796435111236
View all Optoma EP1690 manuals
Add to My Manuals
Save this manual to your list of manuals |
Page 34 highlights
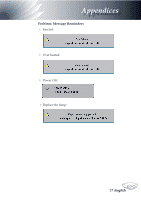
Appendices Troubleshooting If you experience trouble with the projector, refer to the following information. If the problem persists, please contact your local reseller or service center, see page 42 for details. Problem: No image appears on screen Ensure all the cables and power connections are correctly and securely connected as described in the "Installation" section. Ensure the pins of connectors are not crooked or broken. Check if the projection lamp has been securely installed. Please refer to the "Replacing the lamp" section. Make sure you have removed the lens cap and the projector is switched on. Ensure that the "AV Mute" feature is not turned on. (*) The resolution WXGA (1280 x 768) is recommand for computer signal. Problem: Left of right edge of the image is missing or the image is unstable or noisy Press "Re-Sync" on the remote control or control panel. If you are using a PC: For Windows 3.x: 1. In the Windows Program Manager, double click the "Windows Setup" icon in the Main group. 2. Verify that your display resolution setting is less than or equal to 1400 x 1050(*). For Windows 95, 98, 2000, XP: 1. Open the "My Computer" icon, the "Control Panel" folder, and then double click on the "Display" icon. 2. Select the "Settings" tab. 3. Click on the "Advanced Properties" button. English 34 If the projector is still not projecting the whole image, you will also need to change the monitor display you are using. Refer to the following steps. 4. Verify the resolution setting is less than or equal to 1400 x 1050 resolution. 5. Select the "Change" button under the "Monitor" tab. 6. Click on "Show all devices." Next, select "Standard monitor types" under the SP box; choose the resolution mode you need under the "Models" box.
-
 1
1 -
2
-
3
-
4
-
5
-
6
-
7
-
8
-
9
-
10
-
11
-
12
-
13
-
14
-
15
-
16
-
17
-
18
-
19
-
20
-
21
-
22
-
23
-
24
-
25
-
26
-
27
-
28
-
 29
29 -
 30
30 -
 31
31 -
 32
32 -
 33
33 -
 34
34 -
 35
35 -
 36
36 -
 37
37 -
 38
38 -
 39
39 -
40
-
41
-
42
 |
 |