Oreck XL2635RH Owners Guide - Page 6
How to Replace a Worn Belt To Adjust or Replace Brush
 |
View all Oreck XL2635RH manuals
Add to My Manuals
Save this manual to your list of manuals |
Page 6 highlights
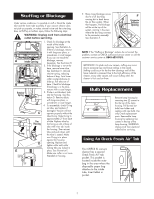
How to Replace a Worn Belt WARNING: Unplug cord from electrical outlet before servicing. Remove the replacement belt from the storage channel. Remove the door by removing the hold down screw located on side of power head. Slide the door forward by prying open with a screwdriver or coin. Remove the belt from the brush roll pulley and the motor drive shaft. Loop the new belt over the motor drive shaft. Place the opposite end of the belt on the brush pulley. Rotate the brush roll three (3) complete revolutions to ensure that no part of the belt is overhanging the end of the motor drive shaft. Replace the door by sliding it into the groove at the bottom of the housing. Replace the hold down screw. To Adjust or Replace Brush WARNING: Unplug cord from electrical outlet before servicing. To determine if the brush is worn, place a firm straight edge across the nozzle opening. If brush bristles do not extend beyond baseplate, brush should be adjusted. Remove the baseplate by removing 5 screws. Then, remove the belt and brush roll from the housing. Rotate both bearing assemblies at ends of brush roll to show "OLD" and replace in the holding channels in the housing. Rotate and match bearing assemblies NOTE: The bearing assembly setting marked "OLD" has a smooth side. The one marked "NEW" has notches. When rotating bearings, make sure both bearing assembly settings are the same and face up when replacing the brush roll. Reassemble the belt and the baseplate and check bristle height above baseplate at each end of brush. IMPORTANT: Unless the brush is worn as indicated above, both bearings must be in the "NEW" position. When rotating, both bearings must be in the "OLD" position. Unmatched settings will cause damage to your machine. If a previous adjustment has already been made and bristle height does not extend above baseplate, a new brush assembly should be ordered. 6
-
 1
1 -
 2
2 -
 3
3 -
 4
4 -
 5
5 -
 6
6 -
 7
7 -
 8
8
 |
 |
