Oregon Scientific GP123 User Manual - Page 6
To Set Sea Level Pressure, Compass Mode, About The Compass - manual
 |
View all Oregon Scientific GP123 manuals
Add to My Manuals
Save this manual to your list of manuals |
Page 6 highlights
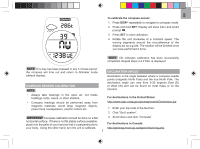
EN maximum altitude record (yes / no), then SET to confirm. TO SET SEA LEVEL PRESSURE 1. Press DISP/- repeatedly to navigate to barometer mode. 2. Press and hold SET to enter settings. 3. Set the following options (sea level pressure, weather forecast icons) by pressing the following buttons: • to increase value or toggle options • DISP/- to decrease value or toggle options • SET to confirm TIP To help device quickly detect weather conditions after its turned on for the first time or after battery reset, you are recommended to manually set the weather icon. If weather icon has not been set, the unit will simply take longer to detect current weather conditions. This device forecasts the next 12 to 24 hours of weather. Sunny Partially cloudy Cloudy Rainy COMPASS MODE IMPORTANT Although the compass has been calibrated during the manufacturing process, it is highly recommended to calibrate the compass before first use to take into account location factors which may affect the compass. For more accurate readings, it is strongly recommended to calibrate the compass whenever outdoors. The compass should be calibrated: • Before first use. • After the battery has been replaced. • Before you leave for an extended outdoor activity. • Whenever it is exposed to strong magnetic sources, extreme cold, or you suspect that other environmental conditions have affected the compass readings. • If you notice that the compass is not showing the direction correctly. ABOUT THE COMPASS The compass shows the bearing in degrees due North together with 16 cardinal / ordinal points. The outer circumference of the display consists of 16 segments that graphically show the bearing. The last lit segment indicates North as shown below. 6
-
 1
1 -
 2
2 -
 3
3 -
 4
4 -
 5
5 -
 6
6 -
 7
7 -
 8
8 -
 9
9 -
 10
10 -
 11
11
 |
 |
