Oster FPSTFP4010 Instruction Manual - Page 10
Food Processing Tips/Liquids
 |
UPC - 034264434097
View all Oster FPSTFP4010 manuals
Add to My Manuals
Save this manual to your list of manuals |
Page 10 highlights
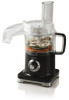
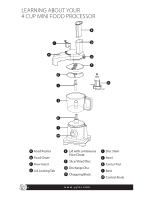
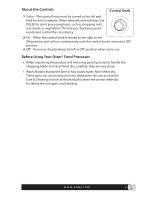
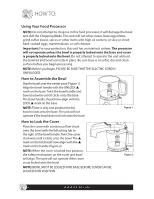
NOTE: Make sure the unit is turned OFF and unplugged before use. Never use hand to push food into processor. Do not use the processor continuously for more than 3 minutes at a time. Processing Into a Separate Bowl 1 Lock the bowl onto base. (See "How to assemble the bowl") 2 Slide the disc stem onto the center post of the base. Slide the discharge disc over the disc stem. With the desired side facing up (slicing or shredding), push the slice/ shred disc onto discharge disc (Figure 8). Use caution when handling, blades are extremely sharp. 3 Lock the cover with continuous flow chute onto bowl. (See "How to lock the cover") NOTE: Make sure the Flow Insert is pulled up so sliced/shredded food will process into the separate bowl (Figure 9). 4 Place a large, low serving/preparation bowl under the continuous flow chute to catch food and spatter (Figure 9). A rimless bowl works better than bowls with a lip. 5 Plug the cord into an electric outlet. 6 Fill the Food Chute with desired food to be processed. 7 Turn the knob to the ON position for continuous processing. Push down with a light but steady pressure onto the Food Pusher (Figure 10). 8 When finished processing, turn the knob to the OFF position and allow the slice/shred disc to stop rotating. Twist the bowl lid counter-clockwise to remove. 9 Carefully remove the Shredding Disc, Discharge Disc and Disc Stem. Unlock the bowl by turning it counter-clockwise to remove. NOTE: Shredding Disc is very sharp, use caution when handling. Food Processing Tips/Liquids • Hot liquids (less than 176˚F, not boiling) and hot foods can be processed in the bowl. www.oster.com Figure 8 Figure 9 Figure 10 9
-
 1
1 -
2
-
3
-
4
-
 5
5 -
 6
6 -
 7
7 -
 8
8 -
 9
9 -
 10
10 -
 11
11 -
 12
12 -
 13
13 -
 14
14 -
 15
15 -
16
-
17
-
18
-
19
-
20
-
21
-
22
 |
 |