Palm P10802U User Guide - Page 9
clicks; then tilt it up and push the flat support outward.
 |
UPC - 805931001719
View all Palm P10802U manuals
Add to My Manuals
Save this manual to your list of manuals |
Page 9 highlights
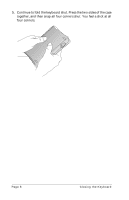
3. Grasp the two side-grips (with red borders) and slide them in toward the keyboard's center until the keyboard sections are completely together. 4. Your next step depends on the kind of keyboard you are opening. Keyboard for the Palm™ V series: While holding the keyboard, slide the docking connector support bracket out until it clicks; then tilt it up and push the flat support outward. Keyboard for the Palm™ III series, Palm™ VII series, and Palm™ m100 series: While holding the keyboard, slide the docking connector support bracket out until the flat support springs upward; then tilt up the docking connector. Setting Up the Keyboard Page 5
-
 1
1 -
2
-
3
-
 4
4 -
 5
5 -
 6
6 -
 7
7 -
 8
8 -
 9
9 -
 10
10 -
 11
11 -
 12
12 -
 13
13 -
 14
14 -
15
-
16
-
17
-
18
-
19
-
20
-
21
-
22
-
23
-
24
 |
 |

Setting Up the Keyboard
Page 5
3.
Grasp the two side-grips (with red borders) and slide them in
toward the keyboard’s center until the keyboard sections are
completely together.
4.
Your next step depends on the kind of keyboard you are opening.
Keyboard for the Palm™ V series:
While holding the key-
board, slide the docking connector support bracket out until it
clicks; then tilt it up and push the flat support outward.
Keyboard for the Palm™ III series, Palm™ VII series, and
Palm™ m100 series:
While holding the keyboard, slide the
docking connector support bracket out until the flat support
springs upward; then tilt up the docking connector.