Panasonic BT-LH1710 User Manual - Page 31
COMP., Sub menu, Settings, Description, AUTOSETUP, H POSITION, V POSITION, PHASE, CLOCK, WXGA/XGA,
 |
UPC - 092281890852
View all Panasonic BT-LH1710 manuals
Add to My Manuals
Save this manual to your list of manuals |
Page 31 highlights
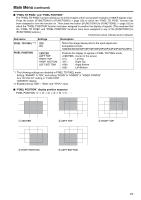
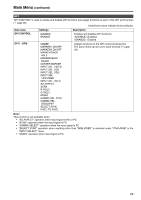
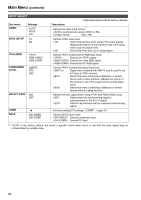
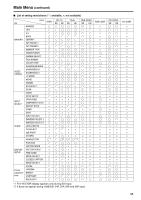
Main Menu (continued) ■ COMP. Selecting "RGB-COMP." under "YPBPR/RGB" in the "INPUT SELECT" menu opens the following menu. Sub menu AUTOSETUP*1 H POSITION V POSITION PHASE CLOCK WXGA/XGA RESET Settings 0 - 60 (Factory preset settings: 30) 0 - 60 (Factory preset settings: 30) 0 - 31 (Factory preset settings: 16 700 - 1800 (Factory preset settings:*3) XGA WXGA Underlined values indicate factory defaults. Description Selecting "RGB-COMP." under "YPBPR/RGB" in the "INPUT SELECT" menu automatically adjusts the screen. A separate screen opens. Select "YES" to perform "AUTOSETUP." Adjusts horizontal image display position.*2 Adjusts vertical image display position.*2 Adjusts the clock phase in 1/32 clock period increments.*2 Adjusts the sampling clock in dot units.*2 Switches between WXGA and XGA. Returns "H POSITION", "V POSITION", "PHASE" and "CLOCK" settings in the COMP. input compliant format to their factory defaults. *1 "EXECUTING" is displayed during "AUTOSETUP" and "COMPLETE" appears when setup completes. "INCOMPLETE" is displayed if setup could not be completed. AUTOSETUP may not provide adequate adjustment for some video input. Use H POSITION, V POSITION, PHASE and CLOCK to adjust. *2 Each input format can be adjusted but not when user data is loaded ("SETUP LOAD" J page 22) or saved ("SETUP SAVE" J page 22). *3 "CLOCK" factory default FORMAT 640 × 400 (70 Hz) 640 × 480 (60 Hz) 640 × 480 (75 Hz) 640 × 480 (85 Hz) 800 × 600 (60 Hz) 800 × 600 (70 Hz) 800 × 600 (75 Hz) 800 × 600 (85 Hz) CLOCK 800 800 840 832 1056 1040 1056 1048 FORMAT 1024 × 768 (60 Hz) 1024 × 768 (70 Hz) 1024 × 768 (75 Hz) 1024 × 768 (85 Hz) 1280 × 768 (50 Hz) 1280 × 768 (60 Hz) 1280 × 768 (75 Hz) 1280 × 1024 (60 Hz) CLOCK 1344 1328 1312 1376 1648 1680 1712 1688 31
-
 1
1 -
2
-
3
-
4
-
5
-
6
-
7
-
8
-
9
-
10
-
11
-
12
-
13
-
14
-
15
-
16
-
17
-
18
-
19
-
20
-
21
-
22
-
23
-
24
-
25
-
 26
26 -
 27
27 -
 28
28 -
 29
29 -
 30
30 -
 31
31 -
 32
32 -
 33
33 -
 34
34 -
 35
35 -
 36
36 -
37
-
38
-
39
-
40
-
41
-
42
-
43
-
44
 |
 |
