Panasonic BTLS1400P BTLS1400 User Guide - Page 5
Introduction, Parts And Their Functions (front Panel)
 |
View all Panasonic BTLS1400P manuals
Add to My Manuals
Save this manual to your list of manuals |
Page 5 highlights
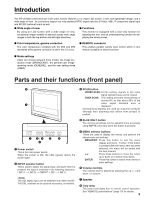
Introduction The BT-LS1400 commercial-use LCD video monitor features a 14 v-type LCD screen, a slim and lightweight design, and a wide angle of view. Its connectors support not only standard NTSC signal input but S-Video, 480i , P component signal input and SD SDI (optional) input as well. ∫ Wide angle of view By using an LCD screen with a wide angle of view, exceptional image visibility is assured across wide angle ranges in both the top-bottom and left-right directions. ∫ Functions This monitor is equipped with a blue-only function for adjusting the hue, and an underscanning function for displaying the whole screen. ∫ Color temperature, gamma correction The color temperature complies with the D65 and D93 standards while gamma correction is set to the 2.2 curve. ∫ REMOTE connector This enables parallel remote input control which in turn makes it possible to select functions. ∫ Mode settings Users can choose between three modes: the image production mode (BROADCAST), the general user imagereceiving mode (GENERAL), and the user setting mode (USER). Parts and their functions (front panel) 8 7 POWER 1 INPUT SCAN BLUE MENU/ EXIT ENTER MENU 24 5 3 VOLUME 6 1 Power switch This is the main power switch. When the power is ON, the LED (green) above the switch lights. 2 INPUT selector button This is used to select the signal input, and each time it is pressed, the input is switched in the following sequence: LINE A > LINE B > CMPNT> SDI > LINE A. The SDI signal input can be selected only when the BTYA210G, available as an optional accessory, is installed. 3 SCAN button UNDER SCAN: At this setting, signals in the video signal standard area can be viewed. OVER SCAN: This setting provides overscanning of around 8% so that about 85% of the video signal standard area is displayed. Overscanning displays are used by consumer products although their scanning ratio differs from product to product. 4 BLUE ONLY button The chroma and phase can be adjusted more accurately using SMPTE color bars when this button is pressed. 5 MENU selector buttons These are used to display the menus and perform the adjustments and settings. MENU/EXIT: Press this button to exit the menu display and menu. Further, if this button is pressed after the menu item has been selected, the menu will be exited with the item entered. WX: Press these buttons to move the cursor up or down or to select menu items. ENTER: Press this button to select menu items or enter settings. 6 Volume controls The volume level is altered by pressing the up (W) and down (X) buttons. 7 Speaker 8 Tally lamp The lamp (red) lights due to remote control operation. See "REMOTE specifications" (page 10) for details. 5
-
 1
1 -
 2
2 -
 3
3 -
 4
4 -
 5
5 -
 6
6 -
 7
7 -
 8
8 -
 9
9 -
 10
10 -
 11
11 -
12
-
13
-
14
-
15
-
16
 |
 |
