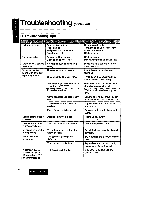
Panasonic CQ-DPX33 Operating Instructions - Page 18
Using the Rubber Cushion, Optional, a Plug the Power Connector, b Install the Trim, Plate, After,
 |
View all Panasonic CQ-DPX33 manuals
Add to My Manuals
Save this manual to your list of manuals |
Page 18 highlights
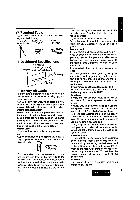
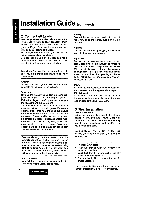
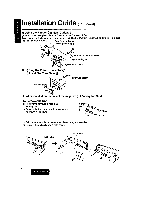
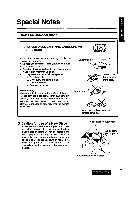
Installation Guide (continued) • Using the Rubber Cushion (Optional) (If there is an existing Rear SupportBracketon the Fire Wall of Car.) Cover MountingBolt _) on the rear of the unitwith Rubber Cushion (Optional), and mountit intoexist- ing Rear Support Bracket. Rear Support Bracket (existing on the car) _) MountingBolt Collar 3. a) Plug the Power Connector ®. b) Install the Trim Plate _. _Trim PI _.
-
 1
1 -
2
-
3
-
4
-
5
-
6
-
7
-
8
-
9
-
10
-
11
-
12
-
 13
13 -
 14
14 -
 15
15 -
 16
16 -
 17
17 -
 18
18 -
 19
19 -
 20
20 -
 21
21 -
 22
22 -
 23
23 -
24
-
25
 |
 |

Installation Guide
(continued)
•
Using the Rubber Cushion
(Optional)
(If there is an existing Rear SupportBracketon the Fire Wall of Car.)
CoverMountingBolt
_)
onthe
rear
of the unitwith Rubber Cushion (Optional), and mountit intoexist-
ing Rear Support Bracket.
Rear Support Bracket
(existing on the car)
_)
MountingBolt
Collar
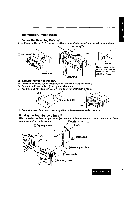
3. a) Plug the Power Connector
®.
b) Install the Trim
Plate
_.
_.<_;-j,_..p_..1_
Power Connector
_Trim
PI
"_':
"
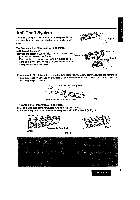
4. After
Installation
reconnect
the negative
(--)
battery
terminal.
To Remove
the
Unit
a) Remove the removableface plate.
(,,, Page 21
.)
b) Remove the trim plate (_ with a screwdriver
as shown
in
the figure.
c)
Pull
out the unitwhile
pushing
the locklever using a screwdriver.
d) Remove the unit pullingwith both hands.
LockLever
20