Panasonic CQC3301U CQC3301U User Guide - Page 9
Preparation
 |
View all Panasonic CQC3301U manuals
Add to My Manuals
Save this manual to your list of manuals |
Page 9 highlights
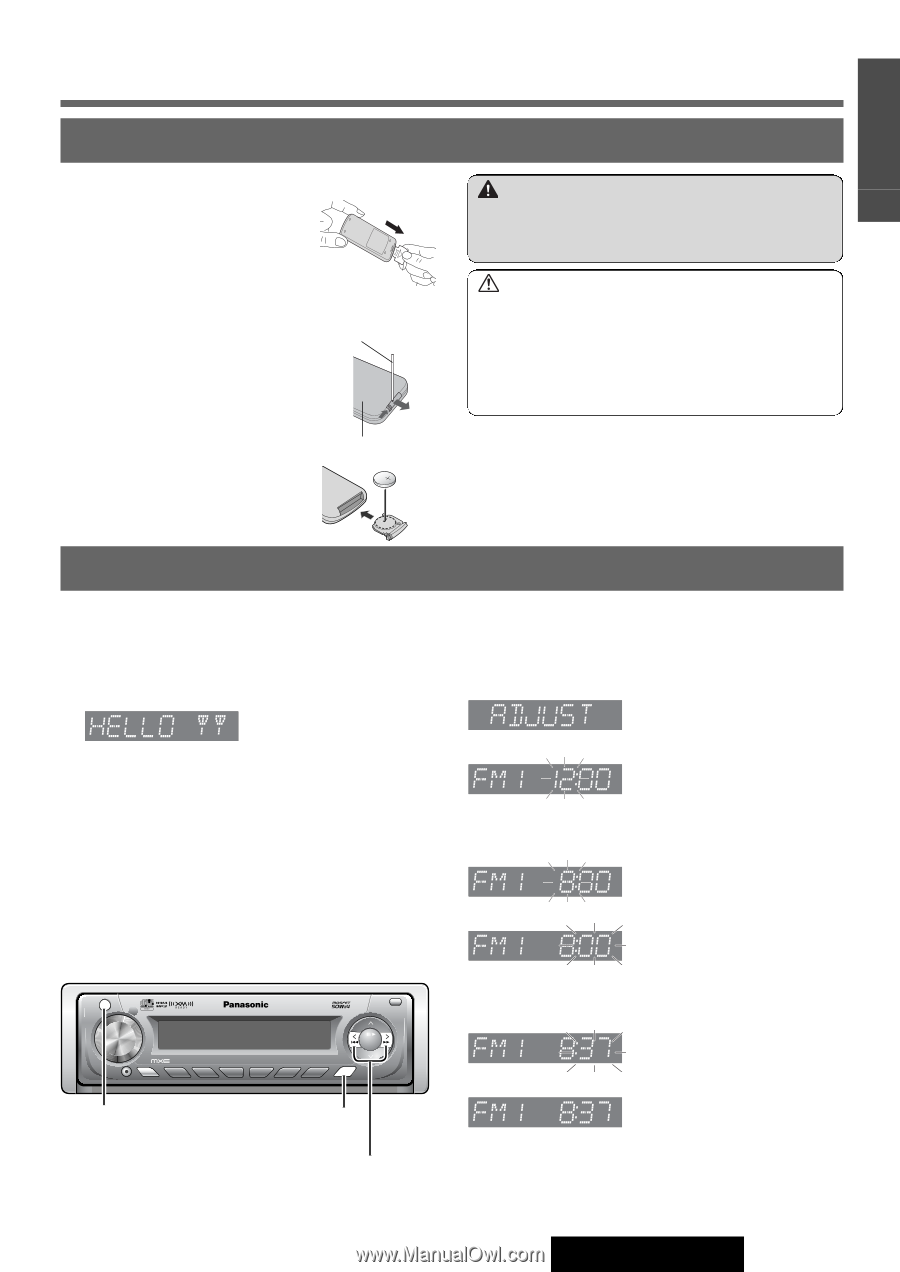
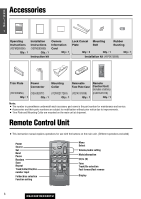
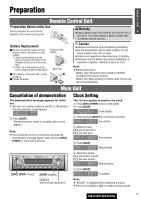
Preparation E N G Remote Control Unit L I S Preparation Before Initial Use Pull the insulation film out from the backside of the remote control gently. H Warning ¡Keep a battery away from children to avoid the risk of 8 accidents. If an infant ingests a battery, please seek immediate medical attention. Battery Replacement q Remove the battery holder with the remote control unit placed on a flat surface. q Stick your thumbnail into the groove and push the holder in the direction of the arrow at the same time. w Pull it out in the direction of the arrow using a tough pointed object. Tough pointed object w q Back side w Put a battery in the case with (+)-side facing up. e Put the case back. 2 3 Caution ¡Remove and dispose of an old battery immediately. ¡Do not disassemble, heat or short a battery. Do not throw a battery into a fire or water. ¡Follow local regulations when disposing of a battery. ¡Improper use of a battery may cause overheating, an explosion or ignition, resulting in injury or a fire. Note: ¡Battery Information: Battery Type: Panasonic lithium battery (CR2025) (Included in the remote control) Battery Life: Approximately 6 months under normal use (at room temperature) Main Unit Cancellation of demonstration The demonstration message appears for initial use. q Set your car's ignition switch to the ACC or ON position. The demonstration screen appears. Clock Setting The 12-hour system is used for the clock. q Press [SRC] (PWR) to turn on the power. w Press [DISP]. Clock display w Press [DISP]. The demonstration screen is canceled, and no more appears. Note: ¡If you would like to turn on the power and make the demonstration message appear, press and hold [SRC] (PWR) for more than 4 seconds. e Press and hold [DISP] for more than 2 seconds. Hour blinks r Adjust the hour. [[]: put forward hour. []]: put back hour. Hour entered t Press [DISP]. Minute blinks PWR SRC V CQ-C3401U OPEN DISC TUNE/TRACK FOLDE OLUME PUSH SE BAND APM L SCROLL RANDOM SCAN REPEAT CLOCK R MUTE SQ 1 2 3 4 5 6 DISP [SRC] (PWR: Power) [DISP] (Display) []] [[] (Hour/minute adjustment) y Adjust the minute. [[]: put forward minute. []]: put back minute. Minute entered u Press [DISP]. Completed Note: ¡"ADJUST" is displayed before adjusting the clock. ¡Press and hold [[] or []] to change numbers rapidly. 9 CQ-C3401U/C3301U
-
 1
1 -
2
-
3
-
 4
4 -
 5
5 -
 6
6 -
 7
7 -
 8
8 -
 9
9 -
 10
10 -
 11
11 -
 12
12 -
 13
13 -
 14
14 -
15
-
16
-
17
-
18
-
19
-
20
-
21
-
22
-
23
-
24
-
25
-
26
-
27
-
28
-
29
-
30
-
31
-
32
-
33
-
34
-
35
-
36
 |
 |