Panasonic CQC3303U CQC3303U User Guide - Page 9
Preparation
 |
View all Panasonic CQC3303U manuals
Add to My Manuals
Save this manual to your list of manuals |
Page 9 highlights
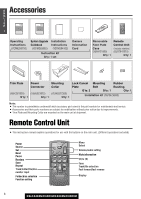
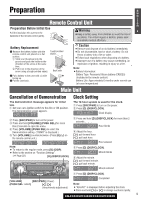
Preparation E N G L Remote Control Unit I S Preparation Before Initial Use Pull the insulation film out from the backside of the remote control gently. H Warning 8 ¡Keep a battery away from children to avoid the risk of accidents. If an infant ingests a battery, please seek immediate medical attention. Battery Replacement q Remove the battery holder with the remote control unit placed on a flat surface. q Stick your thumbnail into the groove and push the holder in the direction of the arrow at the same time. w Pull it out in the direction of the arrow using a tough pointed object. Tough pointed object Back side w Put a battery in the case with (+) side facing up. e Put the case back. Caution ¡Remove and dispose of an old battery immediately. ¡Do not disassemble, heat or short a battery. Do not throw a battery into a fire or water. ¡Follow local regulations when disposing of a battery. ¡Improper use of a battery may cause overheating, an explosion or ignition, resulting in injury or a fire. Note: ¡Battery Information: Battery Type: Panasonic lithium battery (CR2025) (Included in the remote control) Battery Life: Approximately 6 months under normal use (at room temperature) Main Unit Cancellation of Demonstration The demonstration message appears for initial use. q Set your car's ignition switch to the ACC or ON position. The demonstration screen appears. Clock Setting The 12-hour system is used for the clock. q Press [SRC/PWR] to turn on the power. w Press [D] (DISP/CLOCK). Clock display w Press [SRC/PWR] to turn on the power. e Press and hold [VOLUME] (PUSH SEL) for more than 2 seconds to open the menu. r Press [VOLUME] (PUSH SEL) to select the Demonstration setting. ("DEMO" is displayed.) t Turn [VOLUME] counterclockwise. (Press [0] ({) on the remote control unit.) Note: ¡ To return to the regular mode, press [D] (DISP). ¡ Refer to the section on "Function Settings". (a Page 22) [D] (DISP/CLOCK) e Press and hold [D] (DISP/CLOCK) for more than 2 seconds. Hour blinks r Adjust the hour. [[]: put forward hour. []]: put back hour. Hour entered t Press [D] (DISP/CLOCK). Minute blinks y Adjust the minute. [[]: put forward minute. []]: put back minute. Minute entered u Press [D] (DISP/CLOCK). [VOLUME] [SRC/PWR] (Power) (PUSH SEL: select) []] [[] (Hour/minute adjustment) Completed Note: ¡"ADJUST" is displayed before adjusting the clock. ¡Press and hold [[] or []] to change numbers rapidly. 9 CQ-C3433U/C3403U/C3333U/C3303U
-
 1
1 -
2
-
3
-
 4
4 -
 5
5 -
 6
6 -
 7
7 -
 8
8 -
 9
9 -
 10
10 -
 11
11 -
 12
12 -
 13
13 -
 14
14 -
15
-
16
-
17
-
18
-
19
-
20
-
21
-
22
-
23
-
24
-
25
-
26
-
27
-
28
-
29
-
30
-
31
-
32
-
33
-
34
-
35
-
36
-
37
-
38
-
39
-
40
-
41
-
42
-
43
-
44
-
45
-
46
-
47
-
48
-
49
-
50
-
51
-
52
-
53
-
54
-
55
-
56
-
57
-
58
-
59
-
60
-
61
-
62
-
63
-
64
-
65
-
66
-
67
-
68
-
69
-
70
-
71
-
72
-
73
-
74
-
75
-
76
-
77
-
78
-
79
-
80
-
81
-
82
-
83
-
84
-
85
-
86
-
87
-
88
-
89
-
90
 |
 |
