Panasonic CQC5403U CQC5403U User Guide - Page 23
VOLUME], D] DISP, System Upgrade Guidebook
 |
View all Panasonic CQC5403U manuals
Add to My Manuals
Save this manual to your list of manuals |
Page 23 highlights
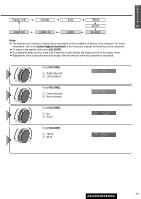
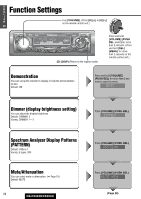
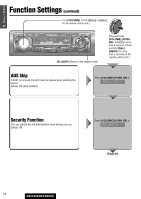
E N G L I Regular mode VOLUME BASS TREBLE S H SQ SET 212 SUBW LPF SUBW LEV FADER BALANCE Note: ¡ The sequence and contents of setting items may depend on the conditions of devices to be connected. For further information, refer to the System Upgrade Guidebook or the instruction manuals for the devices to be connected. ¡ To return to the regular mode, press [D] (DISP). ¡ If no operation takes place for more than 5 seconds in audio setting (2 seconds in the volume adjustment, 10 sec- onds in the SQ adjustment), the display returns to the regular mode. ¡ The volume can also be adjusted directly using [VOLUME] on the main unit. (a Page 10) ¡ Please refer to page 11 for calling up a preset SQ. Turn [VOLUME]. q : Up w : Down w q Turn [VOLUME]. q : Up w : Down w q Turn [VOLUME]. q : Up w : Down w q w q Note: ¡ You cannot save any SQ presetting value in [1] button. ¡ Any SQ adjustments will not change the call up screen names such as ROCK and JAZZ. q Press [[] or []] to select a frequency band (Low, Mid, High). [[]: Higher frequency band []]: Lower frequency band Turn [VOLUME] to select a frequency. q: Higher frequency w: Lower frequency w Press [}] or [{] to adjust the level. [}]: Up [{]: Down e Press and hold one of the preset buttons from [2] to [6] for more than 2 seconds. ¡The adjusted SQ is preset in the num- ber of the selected button, and return to the regular mode resumes. Frequency The selected frequency band blinks. Level ¡When you suspend the SQ preset adjustment, each level remains your recent adjustment until a new SQ presetting operation is performed or you call up the SQ preset. 23 CQ-C5403U/C5303U
-
 1
1 -
2
-
3
-
4
-
5
-
6
-
7
-
8
-
9
-
10
-
11
-
12
-
13
-
14
-
15
-
16
-
17
-
 18
18 -
 19
19 -
 20
20 -
 21
21 -
 22
22 -
 23
23 -
 24
24 -
 25
25 -
 26
26 -
 27
27 -
 28
28 -
29
-
30
-
31
-
32
-
33
-
34
-
35
-
36
-
37
-
38
-
39
-
40
-
41
-
42
-
43
-
44
-
45
-
46
-
47
-
48
-
49
-
50
-
51
-
52
-
53
-
54
-
55
-
56
-
57
-
58
-
59
-
60
-
61
-
62
-
63
-
64
-
65
-
66
-
67
-
68
-
69
-
70
-
71
-
72
-
73
-
74
-
75
-
76
-
77
-
78
-
79
-
80
-
81
-
82
-
83
-
84
-
85
-
86
-
87
-
88
-
89
-
90
-
91
-
92
-
93
-
94
-
95
-
96
-
97
-
98
-
99
-
100
-
101
-
102
-
103
-
104
-
105
-
106
-
107
-
108
 |
 |
