Panasonic DMP-BD50 DMPBD50-MUL User Guide - Page 6
Connection
 |
View all Panasonic DMP-BD50 manuals
Add to My Manuals
Save this manual to your list of manuals |
Page 6 highlights
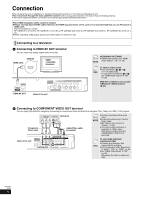
Connection ≥Do not place the unit on amplifiers or equipment that may become hot. The heat can damage the unit. ≥Do not connect through the video cassette recorder. Due to copy guard protection, the picture may not display properly. ≥Turn off all equipment before connection and read the appropriate operating instructions. ≥Non-HDMI-compliant cables cannot be utilized. ≥Please use High Speed HDMI Cables that have the HDMI logo (as shown on the cover). It is recommended that you use Panasonic's HDMI cable. Recommended part number: RP-CDHG10 (1.0 m/3.3 ft), RP-CDHG15 (1.5 m/4.9 ft.), RP-CDHG20 (2.0 m/6.6 ft), RP-CDHG30 (3.0 m/9.8 ft.), RP-CDHG50 (5.0 m/16.4 ft.), etc. ≥When outputting 1080p signal, please use HDMI cables 5.0 meters or less. Connecting to a television A Connecting to HDMI AV OUT terminal You can enjoy high quality, digital video and audio. HDMI cable HDMI IN HDMI compatible television LAN AV OUT 10BASE-T/ 100BASE-TX HDMI AV OUT DIGITAL AUDIO OUT COMPONENT VIDEO OUT COAXIAL Y PB L (PCM/BITSTREAM) AUDIO OUT FRONT L /L SURROUND CENTER L Please connect directly to TV. OPTICAL S VIDEO OUT VIDEO OUT PR R FRONT R /R 2ch R SUBWOOFER 5.1ch Back of the unit NECESSARY SETTINGS ≥"HDMI Video Mode" and "HDMI NOTE Audio Output" : "On" (> 28) TIPS To enjoy a richer sound ≥Use connections E, F or G (> 7, 8) additionally. In case of the connection F or G, set "HDMI Audio Output" to "Off" (> 28) With this connection, you can use VIERA Link "HDAVI Control" (> 23). B Connecting to COMPONENT VIDEO OUT terminal You can enjoy high definition images by connecting to a component video terminals that supports 720p (750p) and 1080i (1125i) signals. COMPONENT VIDEO IN AUDIO IN R L Television Component Video cable Audio/Video cable (included) NOTE ≥Connect terminals of the same color. ≥Unplug the yellow plug of Audio/ Video cable. ≥Set "Black Level Control" to "Darker". (> 26) ≥The video output resolution is restricted to "480p" when DVD-Video is output from the COMPONENT VIDEO OUT terminals. Back of the unit DIGITAL AUDIO OUT COMPONENT VIDEO OUT COAXIAL Y PB L (PCM/BITSTREAM) AUDIO OUT FRONT L /L SURROUND CENTER L Please connect directly to TV. OPTICAL S VIDEO OUT VIDEO OUT PR R FRONT R /R 2ch R SUBWOOFER 5.1ch TIPS To enjoy high definition/ progressive video ≥Connect to a television that supports 480p or higher. ≥Set "Component Video Resolution" to "480p", "720p" or "1080i". (> 28) ≥Set "HDMI Video Mode" to "Off". (> 28) Otherwise, the video is output as 480i. RQT9184 (ENG) 6
-
 1
1 -
 2
2 -
 3
3 -
 4
4 -
 5
5 -
 6
6 -
 7
7 -
 8
8 -
 9
9 -
 10
10 -
 11
11 -
 12
12 -
13
-
14
-
15
-
16
-
17
-
18
-
19
-
20
-
21
-
22
-
23
-
24
-
25
-
26
-
27
-
28
-
29
-
30
-
31
-
32
-
33
-
34
-
35
-
36
-
37
-
38
-
39
-
40
-
41
 |
 |
