Panasonic DMR-EZ475VK Dvd Recorder - English/spanish - Page 30
Recording from an External Device, Recording from a VCR, etc.
 |
UPC - 037988255603
View all Panasonic DMR-EZ475VK manuals
Add to My Manuals
Save this manual to your list of manuals |
Page 30 highlights
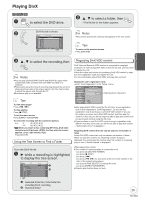
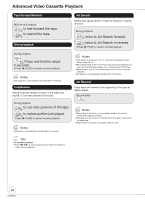
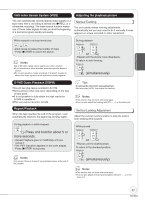
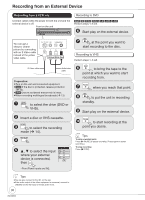
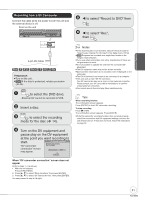
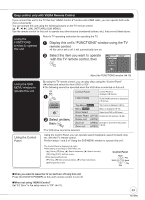
Recording from an External Device Recording from a VCR, etc. Connect cables while the power to both the unit and the external device is off. Front on the unit IN 2 S VIDEO VIDEO L /MONO AUDIO R Recording to DVD [RAM] [-R] [-R]DL] [-RW‹V›] [+R] [+R]DL] [+RW] Perform steps 1−5 left. Start play on the external device. You can get a sharper, clearer picture by connecting with an S Video cable instead of the yellow video cable. IN 2 S VIDEO VIDEO L /MONO AUDIO R Yellow White Red REC at the point you want to start recording to the disc. Recording to VHS Perform steps 1−5 left. S Video cable Audio/video cable Preparation: Turn on the unit and connected equipment. [RAM] If the disc is protected, release protection (¼ 44). [VHS] Ensure accidental erasure tab is intact. When recording multilingual broadcasts (¼ 13) DRIVE SELECT to select the drive (DVD or VHS). Insert a disc or VHS cassette. REC MODE to select the recording mode (¼ 14). INPUT SELECT , to select the input where your external device is connected, then ENTER Input Select 1 TV 2 IN1 3 IN2 4 DV ENTER -Front Panel inputs are IN2. PLAY to bring the tape to the point at which you want to start recording from. PAUSE when you reach that point. REC to put the unit in recording standby. Start play on the external device. PAUSE to start recording at the point you desire. Tips To skip unwanted parts Press [ PAUSE] to pause recording. (Press again to restart recording.) To stop recording Press [ STOP]. Tips You can also connect to the IN1 on the rear. If the audio output of the other equipment is monaural, connect to L/MONO on the IN2 input terminals at the front. 30 RQT8853
-
 1
1 -
2
-
3
-
4
-
5
-
6
-
7
-
8
-
9
-
10
-
11
-
12
-
13
-
14
-
15
-
16
-
17
-
18
-
19
-
20
-
21
-
22
-
23
-
24
-
 25
25 -
 26
26 -
 27
27 -
 28
28 -
 29
29 -
 30
30 -
 31
31 -
 32
32 -
 33
33 -
 34
34 -
 35
35 -
36
-
37
-
38
-
39
-
40
-
41
-
42
-
43
-
44
-
45
-
46
-
47
-
48
-
49
-
50
-
51
-
52
-
53
-
54
-
55
-
56
-
57
-
58
-
59
-
60
-
61
-
62
-
63
-
64
-
65
-
66
-
67
-
68
-
69
-
70
-
71
-
72
-
73
-
74
-
75
-
76
-
77
-
78
-
79
-
80
-
81
-
82
-
83
-
84
-
85
-
86
-
87
-
88
-
89
-
90
-
91
-
92
-
93
-
94
-
95
-
96
-
97
-
98
-
99
-
100
 |
 |
