Panasonic DMR-EZ475VK Dvd Recorder - English/spanish - Page 82
Playback Issues, Sound, Picture continued
 |
UPC - 037988255603
View all Panasonic DMR-EZ475VK manuals
Add to My Manuals
Save this manual to your list of manuals |
Page 82 highlights
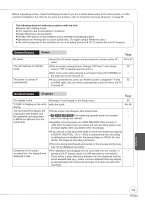
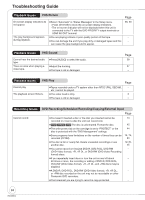
Troubleshooting Guide Playback Issues Picture (continued) Page When playing DVD-Video using Set "Progressive" in the Video menu to "Off". This problem is caused 43 progressive output, one part of by the editing method or material used on DVD-Video, but should be the picture momentarily appears corrected if you use interlaced output. to be doubled up. When you use the HDMI AV OUT terminal for video output, follow − the steps below: (1) Connect this unit to the TV with any cable except the HDMI cable. (2) Set "HDMI Video Output" in the Setup menu to "Off" (¼ 51). There is no apparent change The effect cannot be seen with certain types of video. − in picture quality when making adjustments in the Video menu using the on-screen menus. Playback Issues No sound. Low volume. Distorted sound. Cannot hear the desired audio type. Cannot switch audio. Sound Page Check the connections and the "Digital Audio Output" settings. Check the input mode on the amplifier if you have connected one. Check if TV is muted. Check if amplifier is muted. Press [AUDIO] to select the audio. Sound is not output while fast-forwarding during chasing playback and simultaneous record and playback. Set "V. Surround Sound" in the Audio menu to "Off" in the following cases: -When using discs that do not have surround sound effects, such as Karaoke discs -When playing analog multilingual broadcast recordings The sound effects will not work when the bitstream signal is output from the HDMI AV OUT terminal or the DIGITAL AUDIO OUT terminal. Audio may not be output due to how files were created. (DivX) Audio may not be heard when more than 4 devices are connected with HDMI cables. Reduce the number of connected devices. When the DIGITAL AUDIO OUT terminal is used for audio output and the unit is connected to the television with an HDMI cable, set "HDMI Audio Output" to "Off" in the Setup menu. Depending on the connected equipment, the sound may be distorted if this unit is connected with an HDMI cable. You cannot change the audio type when a DVD-R, DVD-R DL, DVD-RW (DVD-Video format), +R, +R DL, or +RW disc is in the disc tray. You cannot change the audio type when playing a recording of an analog multilingual broadcast on a DVD-R, DVD-R DL, DVD-RW (DVD-Video format), +R, +R DL or +RW disc. You can select "Main" or "Secondary Audio Program (SAP)" in "Multi-channel TV Sound (Analog)" in the Setup menu before recording. Only one language channel is recorded from digital multilingual broadcasts, so you will be unable to change languages during playback. You have used a digital connection. Set "Dolby Digital" to "PCM" or connect using an audio cable (analog connection). There are discs whose audio cannot be changed due to how the disc was created. 50, 60 − − 20, 28 − 43 − − − 51 − − 13, 15, 50 15 50, 60 − 82 RQT8853
-
 1
1 -
2
-
3
-
4
-
5
-
6
-
7
-
8
-
9
-
10
-
11
-
12
-
13
-
14
-
15
-
16
-
17
-
18
-
19
-
20
-
21
-
22
-
23
-
24
-
25
-
26
-
27
-
28
-
29
-
30
-
31
-
32
-
33
-
34
-
35
-
36
-
37
-
38
-
39
-
40
-
41
-
42
-
43
-
44
-
45
-
46
-
47
-
48
-
49
-
50
-
51
-
52
-
53
-
54
-
55
-
56
-
57
-
58
-
59
-
60
-
61
-
62
-
63
-
64
-
65
-
66
-
67
-
68
-
69
-
70
-
71
-
72
-
73
-
74
-
75
-
76
-
 77
77 -
 78
78 -
 79
79 -
 80
80 -
 81
81 -
 82
82 -
 83
83 -
 84
84 -
 85
85 -
 86
86 -
 87
87 -
88
-
89
-
90
-
91
-
92
-
93
-
94
-
95
-
96
-
97
-
98
-
99
-
100
 |
 |
