Panasonic DMRE500H DMRE500 User Guide - Page 25
Timer Recording, Using The Tv Guide On Screen System To Make Timer Recordings, Press [tv Guide].
 |
View all Panasonic DMRE500H manuals
Add to My Manuals
Save this manual to your list of manuals |
Page 25 highlights
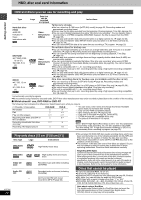
Timer recording Í DVD POWER DVD POWER TV POWER INPUT SELECT TV/VIDEO CH VOLUME Numbered buttons ∫ HDD 1 4 DVD 23 56 SD/PC PAGE CH AUDIO 789 CANCEL VCR Plus+ CM SKIP 0 SKIP SLOW/SEARCH STOP PAUSE PLAY/x1.3 DIRECT NAVIGATOR FUNCTIONS PAGE X CH W VCR Plusr SUB MENU PROG/CHECK DUBBING Info [HDD] [RAM] [DVD-R] TOP MENU SUB MENU ENTER RETURN PROG/CHECK DISPLAY TIME SLIP TV GUIDE SETUP ERASE REC MODE REC Info DUBBING CHAPTER STATUS 3 4 2 1 ENTER TV GUIDE CHAPTER Using the TV Guide On ScreenTM system to make timer recordings You can perform timer recording easily by just marking the desired program(s) in a television program list. ≥You can enter up to 8 days in advance. ≥The program name becomes the recorded title if the program is listed on the television program list. 1 Press [TV GUIDE]. TODAY Last Channel SCHEDULE 8:00PM 87 NWGB LISTINGS SORT 8:30PM 8:00 8:30 pTV TV NWBG ducation FAVORITES RECORD INFO. Navigation menu 2 Press [3, 4, 2, 1] to select the program. ≥To skip one screen Press [PAGE X CH W]. ≥To skip 24 hours in the list Press [3, 4, 2, 1] to select "LISTINGS" and: Press [CHAPTER] (Green) (forward). Press [DUBBING] (Blue) (backward). 3 Press [CHAPTER] (Green). " R " appears in the list to indicate that the program is set for timer recording. ≥Press [CHAPTER] (Green) to cancel. ≥Press [DUBBING] (Blue) to change recording frequency. Each time you press the button: [. l R ; Records only once. l l RR Records when the broadcast time and program name match. l; l l RW Records weekly. ; { R Temporarily cancels the program timer recording without deleting the program setting. Repeat steps 2-3 to program other recordings. Recording ≥As long as the setting is not changed, the program is recorded to the HDD in the recording mode selected by the unit. To change the setting ➡ below. ∫ To change the setting 1Press [SUB MENU] to go to the Navigation menu. 2Press [2, 1] to select "SCHEDULE". 3Press [3, 4] to select the program and press [ENTER]. Start early by : End late by : Quality : Destination : 00 minutes 00 minutes SP HDD 4Change the setting as necessary and press [ENTER]. ≥To set recording to start early or end late Press [3, 4] to select "Start early by" or "End late by" and press the numbered buttons to enter minutes (up to 99). ≥To change the recording mode Press [3, 4] to select "Quality" and press [DUBBING] (Blue). Each time you press the button: LP # EP # FR # XP # SP ≥To change the recording drive Press [3, 4] to select "Destination" and press [DUBBING] (Blue). Each time you press the button: HDD ,-. DVD When the recording drive is "DVD" and there is not enough remaining space, recording automatically switches to the "HDD" (➡ page 27, Relief Recording). 4 Press [TV GUIDE]. Returns to the television screen. ≥The unit is not off. To save power, turn the unit off by pressing [Í DVD POWER]. ≥When using the cable TV box, make sure the cable TV box is turned on. To check, change or delete the program ➡ page 27 To utilize TV Guide On ScreenTM system, see also page 28. Notes on timer recording ➡ page 27 ∫ To cancel recording when recording has already begun Press [∫], then [ENTER] within 5 seconds. ≥You can also press and hold [∫] on the main unit for more than 3 seconds to stop recording. ≥There may be some channels that are not displayed in the television program list even if they are receivable. In this case set them manually (➡ page 26). RQT7394 25
-
 1
1 -
2
-
3
-
4
-
5
-
6
-
7
-
8
-
9
-
10
-
11
-
12
-
13
-
14
-
15
-
16
-
17
-
18
-
19
-
 20
20 -
 21
21 -
 22
22 -
 23
23 -
 24
24 -
 25
25 -
 26
26 -
 27
27 -
 28
28 -
 29
29 -
 30
30 -
31
-
32
-
33
-
34
-
35
-
36
-
37
-
38
-
39
-
40
-
41
-
42
-
43
-
44
-
45
-
46
-
47
-
48
-
49
-
50
-
51
-
52
-
53
-
54
-
55
-
56
-
57
-
58
-
59
-
60
-
61
-
62
-
63
-
64
-
65
-
66
-
67
-
68
-
69
-
70
-
71
-
72
-
73
-
74
-
75
-
76
-
77
-
78
-
79
-
80
-
81
-
82
-
83
-
84
 |
 |
