Panasonic DMREA38V Dvd Recorder - Multi Language - Page 19
Copying Recordings DVD, Press and hold for about 3 seconds.
 |
View all Panasonic DMREA38V manuals
Add to My Manuals
Save this manual to your list of manuals |
Page 19 highlights
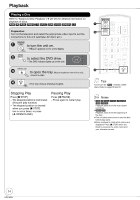
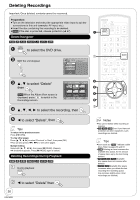
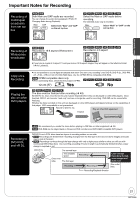
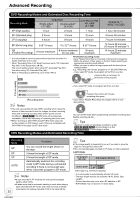
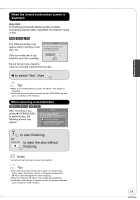
Basic Operations Copying Recordings (DVD VHS) All recordings on the disc are automatically copied onto the tape. If you start copying when the resume function is activated, the DVD is copied from the beginning of the recording where you previously stopped. To copy a whole disc, press [ STOP] to deactivate it before copying ( 14). [RAM] [-R] [-R]DL] [-RW‹V›] [-RW‹VR›] [+R] [+R]DL] [+RW] [VHS] Finalized discs or DVD-Video cannot be copied on this unit. Preparation: Turn on the television and select the appropriate video input to suit the connections to this unit (example: AV input, etc.). [VHS] Ensure accidental erasure tab is intact ( 13). Insert a VHS tape with enough space for recording. Stop the tape at the point where you want to start copying to. Select the VHS recording mode ( 22). Set "HDMI Output Display Aspect" to "Full" ( 59). (The default setting is "Full".) Insert the disc containing the recording to be copied. INPUT SELECT REC MODE REC COPYING COPYING indicator Tips Icons such as " [RAM] " indicate usable discs. Refer to pages 66 and 67. Notes When copying doesn't start, the "COPYING" indicator on the main unit blinks for about 7 seconds. Check if the unit is properly prepared. On the main unit Press and hold for about 3 seconds. COPYING − COPY will appear in the unit's display when the copying process begins. − Copying automatically stops when playback of the disc finishes or the tape reaches its end. Tips Additional navigation You can begin the same kind of copy by using COPY Navigator. Use the operations listed below instead of step shown above. 1. Press [FUNCTIONS]. 2. Press [, ] to select "Copy" then press [OK]. Copy Navigator screen appears. 3. Press [, ] to select "DVD to VHS" then press [OK]. When you start copying from the selected recording 1. Press [DRIVE SELECT] to select the DVD drive. 2. Press [DIRECT NAVIGATOR]. [RAM] When the Album View screen is displayed, press [A] to switch to the Recordings screen. 3. Press to select the recording you want to start, then press [OK]. 4. Go to step of "Copying Recordings (DVD VHS)" shown above. Index signals are automatically recorded on the tape according to the division of recordings on the DVD [ 34, VHS Index Search System (VISS)]. To cancel copying in the middle Press [ STOP]. − You can also press and hold [RETURN] for about 3 or more seconds to cancel copying in the middle. 19 RQT9058
-
 1
1 -
2
-
3
-
4
-
5
-
6
-
7
-
8
-
9
-
10
-
11
-
12
-
13
-
 14
14 -
 15
15 -
 16
16 -
 17
17 -
 18
18 -
 19
19 -
 20
20 -
 21
21 -
 22
22 -
 23
23 -
 24
24 -
25
-
26
-
27
-
28
-
29
-
30
-
31
-
32
-
33
-
34
-
35
-
36
-
37
-
38
-
39
-
40
-
41
-
42
-
43
-
44
-
45
-
46
-
47
-
48
-
49
-
50
-
51
-
52
-
53
-
54
-
55
-
56
-
57
-
58
-
59
-
60
-
61
-
62
-
63
-
64
-
65
-
66
-
67
-
68
-
69
-
70
-
71
-
72
-
73
-
74
-
75
-
76
-
77
-
78
-
79
-
80
-
81
-
82
-
83
-
84
-
85
-
86
-
87
-
88
-
89
-
90
-
91
-
92
 |
 |
