Panasonic DVDLX110 DVDLX110 User Guide - Page 33
USING THIS UNIT WITH OTHER EQUIPMENT, Enjoying with 5.1ch audio, Enjoying with a television
 |
View all Panasonic DVDLX110 manuals
Add to My Manuals
Save this manual to your list of manuals |
Page 33 highlights
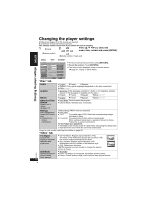
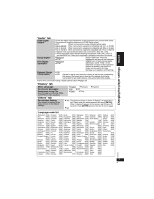
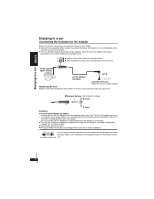
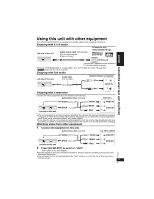
Using this unit with other equipment Turn off all equipment before connecting and read the appropriate operating instructions. Enjoying with 5.1ch audio Left side of this unit AUDIO /OPT OUT Digital optical cable (not included) p Do not bend sharply. p Align and insert. AV amplifier with Dolby Digital/DTS logo OPTICAL IN Connect the 6 speakers to the amplifier's 5.1ch audio output terminals. p Change "PCM Digital Output", "Dolby Digital", and "DTS Digital Surround" (➜ page 29). p [DVD-A] Output will be only 2 channels. Enjoying with 2ch audio Left side of this unit AUDIO /OPT OUT Audio cable (not included) Black Amplifier/System component White L AUDIO IN Using this unit with other equipment Red R Enjoying with a television Connect the video output from this unit directly to the television. Audio/video cable (included) Yellow Yellow Television VIDEO IN VIDEO AUDIO /OPT OUT Left side of this unit Black White Red L AUDIO IN R p The unit's speakers do not have magnetic shielding. Do not place the unit near televisions, personal computers or other devices easily influenced by magnetism. Do not keep this unit and magnetized cards (bank cards, commuter passes, etc.) close together. p If you raise the volume on the television while playing this unit, the volume may abruptly become very loud when you switch to a television broadcast. Return the volume to its normal level before changing. Watching video from other equipment 1 Connect the equipment to this unit. Audio/video cable (included) e.g. Video camera Yellow Yellow VIDEO OUT VIDEO AUDIO /OPT OUT Left side of this unit Black White Red L AUDIO OUT R RQT8231 2 Press [AV SELECT] to switch to "AUX" . "AUX" lights on the unit's display. p Operate playback using the connected equipment. (Please read the operating instructions for the connected equipment) p The unit does not turn off automatically while "AUX" mode is on. Turn the unit off when you have finished using it. 33 33
-
 1
1 -
2
-
3
-
4
-
5
-
6
-
7
-
8
-
9
-
10
-
11
-
12
-
13
-
14
-
15
-
16
-
17
-
18
-
19
-
20
-
21
-
22
-
23
-
24
-
25
-
26
-
27
-
 28
28 -
 29
29 -
 30
30 -
 31
31 -
 32
32 -
 33
33 -
 34
34 -
 35
35 -
 36
36 -
 37
37 -
 38
38 -
39
-
40
-
41
 |
 |
