Panasonic EY7960 EY7460 User Guide - Page 7
V. Assembly
 |
View all Panasonic EY7960 manuals
Add to My Manuals
Save this manual to your list of manuals |
Page 7 highlights
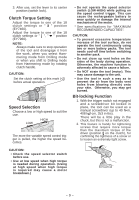
23) Do not short the battery pack. A battery short can cause a large current flow, over heating and burns. 24) NOTE: If the supply cord of this appliance is damaged, it must only be replaced by a repair shop appointed by the manufacturer, because special purpose tools are required. 25) TO REDUCE THE RISK OF ELECTRIC SHOCK, THIS APPLIANCE HAS A POLARIZED PLUG (ONE BLADE IS WIDER THAN THE OTHER). This plug will fit in a polarized outlet only one way. If the plug does not fit fully in the outlet, reverse the plug. If it still does not fit, contact a qualified electrician to install the proper outlet. Do not change the plug in any way. V. ASSEMBLY Attaching or Removing Bit NOTE: When attaching or removing a bit, disconnect battery pack from tool or place the switch in the center position (switch lock). This tool is equipped with a keyless drill chuck. 1. Attachment Insert the bit and turn the lock collar clockwise (looking from the front) to tighten firmly until it stops clicking. WARNING: • Do not use other than the Panasonic battery packs that are designed for use with this rechargeable tool. • Do not dispose of the battery pack in a fire, or expose it to excessive heat. • Do not drive the likes of nails into the battery pack, subject it to shocks, dismantle it, or attempt to modify it. • Do not allow metal objects to touch the battery pack terminals. • Do not carry or store the battery pack in the same container as nails or similar metal objects. • Do not charge the battery pack in a high-temperature location, such as next to a fire or in direct sunlight. Otherwise, the battery may overheat, catch fire, or explode. • Never use other than the dedicated charger to charge the battery pack. Otherwise, the battery may leak, overheat, or explode. • After removing the battery pack from the tool or the charger, always reattach the pack cover. Otherwise, the battery contacts could be shorted, leading to a risk of fire. Lock collar 2. Removal Turn the lock collar counterclockwise (looking from the front), then remove the bit. NOTE: If excessive play occurs in the chuck, secure the drill in place and open the chuck jaws by turning the lock collar and tighten the screw (left-handed screw) with a screwdriver by turning it counterclockwise (viewed from the front). - 7 -
-
 1
1 -
 2
2 -
 3
3 -
 4
4 -
 5
5 -
 6
6 -
 7
7 -
 8
8 -
 9
9 -
 10
10 -
 11
11 -
 12
12 -
13
-
14
-
15
-
16
-
17
-
18
-
19
-
20
-
21
-
22
-
23
-
24
-
25
-
26
-
27
-
28
-
29
-
30
-
31
-
32
-
33
-
34
-
35
-
36
-
37
-
38
-
39
-
40
-
41
-
42
-
43
-
44
 |
 |
