Panasonic EY7960 EY7460 User Guide - Page 9
Clutch Torque Setting, Speed Selection, Bit-locking Function - hammer drill driver
 |
View all Panasonic EY7960 manuals
Add to My Manuals
Save this manual to your list of manuals |
Page 9 highlights
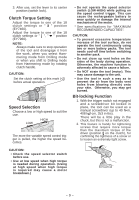
3. After use, set the lever to its center position (switch lock). Clutch Torque Setting Adjust the torque to one of the 18 clutch settings or " " position (EY7460). Adjust the torque to one of the 18 clutch settings or " ", " " position (EY7960). NOTE: Always make sure to stop operation of the tool and disengage it from the work, when you select Hammering mode from Drilling mode or when you shift to Drilling mode from Hammering mode by rotating clutch handle. CAUTION: Set the clutch setting at this mark ( ) before actual operation. Speed Selection Choose a low or high speed to suit the use. LOW HIGH The more the variable speed control trigger is pulled, the higher the speed becomes. • Do not operate the speed selector switch (LOW-HIGH) while pulling on the speed control trigger. This can cause the rechargeable battery to wear quickly or damage the internal mechanism of the motor. * See specifications for "MAXIMUM RECOMMENDED CAPACITIES". CAUTION: • To prevent excessive temperature increase of the tool surface, do not operate the tool continuously using two or more battery packs. The tool needs cool-off time before switching to another pack. • Do not close up vent holes on the sides of the body during operation. Otherwise, the machine function is adversely affected to cause a failure. • Do NOT strain the tool (motor). This may cause damage to the unit. • Use the tool in such a way as to prevent the air from the body vent holes from blowing directly onto your skin. Otherwise, you may get burned. Bit-locking Function 1. With the trigger switch not engaged and a screwdriver bit locked in place, the tool can be used as a manual screwdriver (up to 40 N•m, 408 kgf-cm, 353 in-lbs). There will be a little play in the chuck, but this is not a malfunction. 2. This feature is handy for tightening screws that require more torque than the maximum torque of the driver (position on the clutch), for confirming the tightness of a screw or to loosen an extremely tight screw. CAUTION: • Check the speed selector switch before use. • Use at low speed when high torque is needed during operation. (Using at high speed when high torque is required may cause a motor breakdown.) - 9 -
-
 1
1 -
2
-
3
-
 4
4 -
 5
5 -
 6
6 -
 7
7 -
 8
8 -
 9
9 -
 10
10 -
 11
11 -
 12
12 -
 13
13 -
 14
14 -
15
-
16
-
17
-
18
-
19
-
20
-
21
-
22
-
23
-
24
-
25
-
26
-
27
-
28
-
29
-
30
-
31
-
32
-
33
-
34
-
35
-
36
-
37
-
38
-
39
-
40
-
41
-
42
-
43
-
44
 |
 |
