Panasonic HC-X2000 HC-X1500 Basic Operating Manual - Page 48
When having no time to adjust the white balance
 |
View all Panasonic HC-X2000 manuals
Add to My Manuals
Save this manual to your list of manuals |
Page 48 highlights
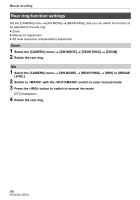
Manual recording ∫ When stored in white balance [Ach] 1 Switch to with the switch to enter manual mode. 2 Set the gain value. (l 49) Normally, set this to 0 dB. If it is too dark, set the gain to an appropriate value. 3 Press the button to switch to [Ach]. Each time you press the button, the white balance switches in the order "Preset", [Ach], [Bch]. 4 Change the switch settings according to the light conditions. 5 Place the white pattern at a point where the light conditions match those for the light source for the subject, and zoom in on the white pattern so that the white color appears in the screen. 6 Adjust the iris (the lens stop). Adjust the iris so that the brightness of Y GET is approx. 70%. 7 Either press the USER button assigned to [AWB] or touch the USER button icon. Automatic adjustment of the white balance starts and the white balance adjustment value is memorized. @ NOTE 0 The content previously set is maintained in [Ach] or [Bch]. Make the settings again if the lighting conditions have changed. When having no time to adjust the white balance 1 Press the button to switch to "Preset". 2 Either press the USER button assigned to [AWB] or touch the USER button icon to switch the white balance. [P 3200K], [P 5600K], and "VAR" (the value set in the [CAMERA] menu → [SW MODE] → [W.BAL VAR]) change in order. ≥ When "VAR" is selected, turning the multidial can set any white balance value between [V 2000K] and [V 15000K]. @ NOTE ≥ The "VAR" value displayed on the camera image screen is not guaranteed to be an absolute value.Use it for reference purposes only. 48 DVQX2023 (ENG)
-
 1
1 -
2
-
3
-
4
-
5
-
6
-
7
-
8
-
9
-
10
-
11
-
12
-
13
-
14
-
15
-
16
-
17
-
18
-
19
-
20
-
21
-
22
-
23
-
24
-
25
-
26
-
27
-
28
-
29
-
30
-
31
-
32
-
33
-
34
-
35
-
36
-
37
-
38
-
39
-
40
-
41
-
42
-
 43
43 -
 44
44 -
 45
45 -
 46
46 -
 47
47 -
 48
48 -
 49
49 -
 50
50 -
 51
51 -
 52
52 -
 53
53 -
54
-
55
-
56
-
57
-
58
-
59
-
60
-
61
-
62
-
63
-
64
 |
 |
