Panasonic HDCSD90 HDCSD90 User Guide - Page 43
Alert Sound], Power Lcd], Lcd Set], Av Multi], Component Out], Hdmi Resolution], Viera Link], Touch
 |
View all Panasonic HDCSD90 manuals
Add to My Manuals
Save this manual to your list of manuals |
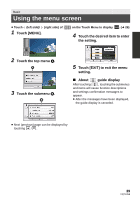
Page 43 highlights
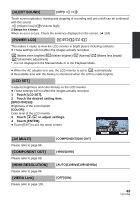
[ALERT SOUND] [OFF]/ / Touch screen operation, starting and stopping of recording and unit on/off can be confirmed with this sound. (Volume low)/ (Volume high) 2 Beeps for 4 times When an error occurs. Check the sentence displayed on the screen. (l 134) [POWER LCD] +2 / +1 / 0 / -1 / A This makes it easier to view the LCD monitor in bright places including outdoors. ≥ These settings will not affect the images actually recorded. +2 (Makes even brighter)/ +1 (Makes brighter)/ 0 (Normal)/ -1 (Makes less bright)/ A *(Automatic adjustment) * It is not displayed in the Manual Mode or in the Playback Mode. ≥ When the AC adaptor is in use, the LCD monitor is set to +1 automatically. ≥ Recordable time with the battery is shortened when the LCD is made brighter. [LCD SET] It adjusts brightness and color density on the LCD monitor. ≥ These settings will not affect the images actually recorded. 1 Touch [LCD SET]. 2 Touch the desired setting item. [BRIGHTNESS]: Brightness of the LCD monitor [COLOR]: Color level of the LCD monitor 3 Touch / to adjust settings. 4 Touch [ENTER]. ≥ Touch [EXIT] to exit the menu screen. [AV MULTI] Please refer to page 99. [COMPONENT OUT] Please refer to page 99. [HDMI RESOLUTION] Please refer to page 99. [VIERA Link] Please refer to page 100. [COMPONENT]/[AV OUT] [480i]/[1080i] [AUTO]/[1080p]/[1080i]/[480p] [OFF]/[ON] 43 VQT3J56
-
 1
1 -
2
-
3
-
4
-
5
-
6
-
7
-
8
-
9
-
10
-
11
-
12
-
13
-
14
-
15
-
16
-
17
-
18
-
19
-
20
-
21
-
22
-
23
-
24
-
25
-
26
-
27
-
28
-
29
-
30
-
31
-
32
-
33
-
34
-
35
-
36
-
37
-
 38
38 -
 39
39 -
 40
40 -
 41
41 -
 42
42 -
 43
43 -
 44
44 -
 45
45 -
 46
46 -
 47
47 -
 48
48 -
49
-
50
-
51
-
52
-
53
-
54
-
55
-
56
-
57
-
58
-
59
-
60
-
61
-
62
-
63
-
64
-
65
-
66
-
67
-
68
-
69
-
70
-
71
-
72
-
73
-
74
-
75
-
76
-
77
-
78
-
79
-
80
-
81
-
82
-
83
-
84
-
85
-
86
-
87
-
88
-
89
-
90
-
91
-
92
-
93
-
94
-
95
-
96
-
97
-
98
-
99
-
100
-
101
-
102
-
103
-
104
-
105
-
106
-
107
-
108
-
109
-
110
-
111
-
112
-
113
-
114
-
115
-
116
-
117
-
118
-
119
-
120
-
121
-
122
-
123
-
124
-
125
-
126
-
127
-
128
-
129
-
130
-
131
-
132
-
133
-
134
-
135
-
136
-
137
-
138
-
139
-
140
-
141
-
142
-
143
-
144
-
145
-
146
-
147
-
148
-
149
-
150
-
151
-
152
-
153
-
154
-
155
-
156
-
157
-
158
-
159
-
160
-
161
-
162
-
163
-
164
-
165
-
166
-
167
-
168
 |
 |
