Panasonic KXTG2503S KXTG2503S User Guide - Page 2
Getting Started
 |
View all Panasonic KXTG2503S manuals
Add to My Manuals
Save this manual to your list of manuals |
Page 2 highlights
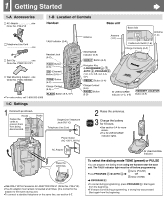
1 Getting Started 1-A Accessories 1-B Location of Controls AC Adaptor one Order No. PQLV1Z Handset Telephone Line Cord one TALK Indicator (2-A) Belt Clip one Order No. PQKE10127Z1 Wall Mounting Adaptor ..one Order No. PQKL10038Z3 Headset Jack (6-C) (TALK) Button (2-A) (CH) (Channel) Button (2-A) (TONE) Button (5-C) Charge Contact (6-A) TALK OOFNF AUTO CH 1 4 7 TONE RLIONUGEDR 2 5 8 0 DIRECT PROGRAM REDIAL 3 6 9 FLASH PAUSE (FLASH) Button (5-A, 5-F) • For extra orders, call 1-800-332-5368. Antenna Base unit Antenna (1-C) Back Side Antenna (1-C) Cradle Lock Switch (1-E) RECHARGE Indicator (6-A) Charge Contacts (6-A) (DIRECT) Button (4-A) Navigator Key (LOUD/RINGER , , AUTO , PROGRAM ) (1-C, 2-A, 2-B, 3-A, 4-A, 5-F) (REDIAL) Button (2-A) Charge Contact (6-A) (PAUSE) Button (5-D) IN USE/CHARGE Indicator (1-C, 5-E) (HANDSETÒLOCATOR) Button (5-E) 1-C Settings 1 Connect as shown. Hooks Fasten the cords to prevent them from being disconnected. Hooks Single-Line Telephone Jack (RJ11C) Telephone Line Cord Power Outlet (AC 120 V, 60 Hz) 2 Raise the antennas. 3 Charge the battery STOP for 6 hours. •See section 6-A for more details. •The IN USE/CHARGE indicator lights. AC Adaptor Raise the antennas. •USE ONLY WITH Panasonic AC ADAPTOR PQLV1 (Order No. PQLV1Z). •The AC adaptor must remain connected at all times. (It is normal for the adaptor to feel warm during use.) •To connect a standard telephone on the same line, see section 6-E. IN USE/CHARGE Indicator To select the dialing mode TONE (preset) or PULSE You can program the dialing mode using the handset near the base unit. The TALK indicator light must be off before programming. (#) twice (PULSE) Press PROGRAM á \ AUTO Ü \ OR \ (*) twice (TONE) \ PROGRAM á. •To cancel during programming, press PROGRAM á. Start again from the beginning. •If 3 beeps sound during programming, a wrong key was pressed. Start again from the beginning.
-
 1
1 -
 2
2 -
 3
3 -
 4
4 -
 5
5 -
 6
6 -
 7
7 -
 8
8
 |
 |