Panasonic MCCG467 MCCG467 User Guide - Page 5
Cautions, C - How To Operate Your Cleaner, D - Maintenance And Servicing - mc cg467
 |
UPC - 037988690763
View all Panasonic MCCG467 manuals
Add to My Manuals
Save this manual to your list of manuals |
Page 5 highlights
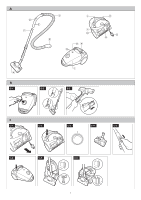
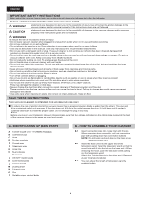
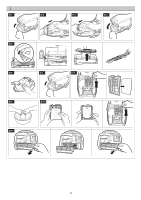
C - HOW TO OPERATE YOUR CLEANER C-1 Pull out the mains lead and put the plug into the socket outlet. C-2 Gently press at the centre of the switch pedal to turn ON the vacuum cleaner. Press the pedal again to turn it OFF. C-3 Power control To increase or decrease the power, turn the variable power control button. C-4 Switching 3 positions. Flooring (PARQUET): Set position A Carpet (short): Set position B Carpet (long or hard to push): Set position C C-5 The curved wand of the hose is attached with a manual suction regulator, which allows you to briefly reduce the suction level. C-6 After you finish vacuuming, remove the plug from the wall socket and press the cord rewind pedal. When rewinding the power cord, press the cord rewind pedal by holding the plug so that it does not become damaged. C-7 Storage position Slide the wand holder attached to turbine nozzle pipe straight into the wand supporter on the under side of the main body. C-8 Park position For short breaks during vacuuming, slide the wand holder attached to the turbine nozzle pipe into the wand supporter on the rear side of main body. NOTE: When you use park position, we suggest the appliance is switched off. D - MAINTENANCE AND SERVICING CAUTIONS • The plug must be removed from the socket-outlet before cleaning or maintaining the appliance. • To avoid injury, keep your fingers and hands away from the beater bar. • DO NOT use hot air or hot surface to dry filters. Keep at room temperature for approximately 24 hours. • IMPORTANT: Before re-installing the washable filters, make sure they are completely dry to avoid damaging the cleaner. Indicator for replacing the dust bag Turn the power control to the highest setting and lift the nozzle off the floor. If the dust indicator turns red, the dust bag is full and requires replace the dust bag. NOTE: If the dust bag is not properly installed, the cover will not close. Be sure to check that the bag is properly installed before operating, otherwise dust will leak out. The dust bag can easily lay on the dust cover packing or clip between bag collar and body, so be sure to properly extend it into the vacuum cleaner body. Replacing the dust bag D-1 Lift dust cover catch and raise dust cover until it clicks properly. D-2 Remove bag collar from bag holder and pull out dust bag. D-3 Set a new dust bag. D-4 Close dust cover properly until you hear it click. Turbine nozzle D-5 After removing the brush cover with a coin, remove the beater bar from the belt. Then cut across threads, strings, hairs, etc. from the beater bar with a pair of scissors. (Removal as per reverse procedure) NOTE: Take care not to cut the brush. Do not wash in water. Vacuum cleaner body D-6 Wipe with a soft cloth soaked with water. Maintaining the Pre-motor Filter Follow the procedure written below when the suction power is not restored after replacing a new bag. D-7 Open the dust cover. D-8 Remove the pre-motor filter. D-9 Wash gently with water and then allow to dry in a shaded location. D-10 Replace to its original location. NOTE: Make sure you remember to replace the filter. If the filter is not installed, it will cause motor failure. • Do not wash the filter in a washing machine or dry it with a dryer or other source of hot air. Filter care D-11 Exhaust filter Exhaust filter is installed in the rear side of the vacuum cleaner. This filter retains any small dust particles which may be present in the expelled air. It is advisable to change the filter once or twice a year, depending on use. To change the filter, hold the exhaust cover (as illustrated) and pull it out. After changed the filter, set the exhaust cover to its position (as illustrated). NOTE: IMPORTANT: Never use the cleaner without the correct filters properly installed. Failure to do so may result in damage to the motor. What to do if your cleaner does not work Check that the appliance is correctly plugged in and that the electrical socket is working. In case that the thermal cut-out device has operated, wait until it resets after approximately 60 minutes. If after having checked the mentioned points, the cleaner does not work, take it to an Authorized Service Centre to be repaired. What to do when the suction performance reduces • Stop the cleaner and unplug from the socket. • Check whether the wands, hose and accessories are blocked or not. If they are blocked, remove the obstruction. • Check that the dust bag is full. If it is full, replace it to a new one. • Check that Pre-motor Filter or Exhaust Filter is blocked with dust. If they are blocked, clean them out or replace. SPECIFICATIONS POWER SOURCE CURRENT AUTOMATIC CORD REWIND DUST BAG DUST CAPACITY CORD LENGTH EXTENSION WANDS NOZZLE WEIGHT (WITH ACCESSORIES) DIMENSIONS (W×L×H) ACCESSORIES NOZZLE MC-CG467 AC120V ~ 60Hz 11Amps YES PAPER 3.0L 5.0m (16Ft.) METAL TELESCOPIC 3 in 1 TURBINE NOZZLE 4.5 kg (9.9lbs.) 280mm×425mm×260mm (11in×16.7in×10.2in) CREVICE NOZZLE & DUSTING BRUSH REMINDER FOR CUSTOMER The model and serial number of this product may be found on the nameplate located at the underside of your cleaner. You should note the model and serial number in the spaces provided and retain this book as a permanent record of your purchase. Model Number Serial No Date Purchased Where Purchased 5
-
 1
1 -
 2
2 -
 3
3 -
 4
4 -
 5
5 -
 6
6 -
 7
7 -
 8
8 -
 9
9 -
 10
10 -
 11
11 -
12
 |
 |