Panasonic NNC994S Microwave/conv.oven - Page 9
Feature Diagram, Cooking Modes: Heating Source - specifications
 |
UPC - 037988907779
View all Panasonic NNC994S manuals
Add to My Manuals
Save this manual to your list of manuals |
Page 9 highlights
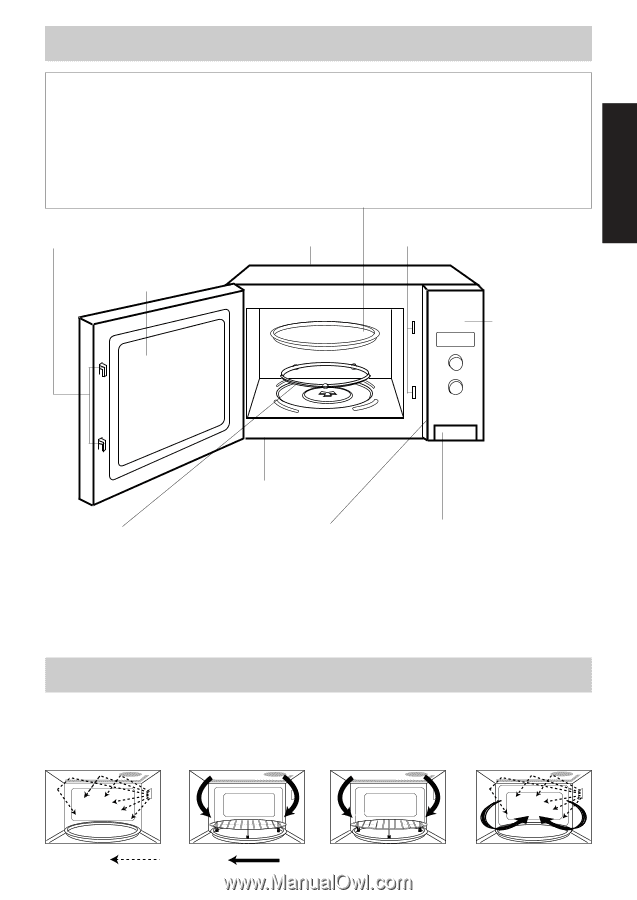
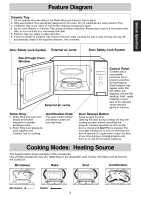
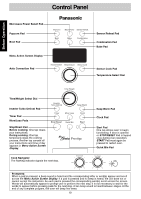
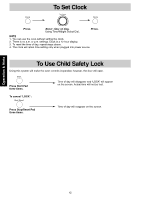
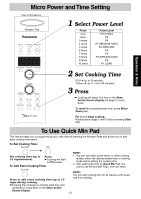
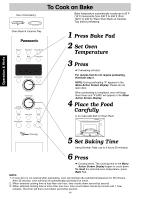
Before Operation Feature Diagram Ceramic Tray 1. Do not operate the oven without the Roller Ring and Ceramic Tray in place. 2. Only use Ceramic Tray specifically designed for this oven. Do not substitute any other Ceramic Tray. 3. If Ceramic Tray is hot, allow to cool before cleaning or placing in water. 4. Do not cook directly on Ceramic Tray unless otherwise indicated. Always place food in a microwave-safe dish, or on a rack set in a microwave-safe dish. 5. Ceramic Tray can rotate in either direction. 6. If food or utensil on Ceramic Tray touches the oven walls, causing the tray to stop moving, the tray will automatically rotate in the opposite direction. This is normal. Door Safety Lock System External air vents Door Safety Lock System See-through Oven Window External air vents Roller Ring 1. Roller Ring and oven floor should be cleaned frequently to prevent excessive noise. 2. Roller Ring must always be used together with Ceramic Tray for cooking. Identification Plate The oven model number and serial number are recorded here. Control Panel: Covered with a removeable protective film to prevent scratches during shipping. Small bubbles may appear under this film. When this happens, remove film carefully. (Hint - apply masking or clear tape to an exposed corner and pull gently to remove). Door Release Button Press to open the door. Opening the door during cooking will stop the cooking process without cancelling the program. Cooking resumes as soon as the door is closed and Start Pad is pressed. The oven light will stay on or turn on whenever the door is opened. It is quite safe to open the door at any time during a cooking program and there is no risk of microwave exposure. Cooking Modes: Heating Source The diagram below shows examples of the accessories. Use of these accessories may vary depending on the recipe/dish used. Further information can be found in the Cookbook. Microwave Bake Broil Combination Microwave Heater 9
-
 1
1 -
2
-
3
-
 4
4 -
 5
5 -
 6
6 -
 7
7 -
 8
8 -
 9
9 -
 10
10 -
 11
11 -
 12
12 -
 13
13 -
 14
14 -
15
-
16
-
17
-
18
-
19
-
20
-
21
-
22
-
23
-
24
-
25
-
26
-
27
-
28
 |
 |