Panasonic P2 Handheld Camcorder Advance Operating Instructions - Page 61
Using time data, Counter setting and display, Time data overview
 |
View all Panasonic P2 Handheld Camcorder manuals
Add to My Manuals
Save this manual to your list of manuals |
Page 61 highlights
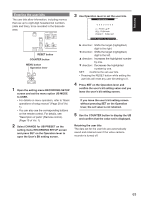
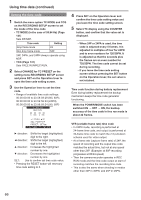
Shooting Using time data The camera-recorder provides time data such as time codes, user bits, time of day (real-time) data, which is recorded on each frame alongside video data. It is also recorded as data in clip metadata files. Counter setting and display Pressing the COUNTER button to view the counter displays the counter value on the time code indicator in the LCD and in the viewfinder. (Page 121) The counter value is indicated in "Hour : Minute . Second" format. The counter value is not displayed during playback. The menu option REC COUNTER in the DISPLAY SETUP screen can be set to display two types of counters. (Page 149) TOTAL: provides a continuous count until reset by pressing the COUNTER RESET button. The counter value is retained when P2 cards are replaced and when the power is turned off. CLIP: The counter is reset to 0 at the start of each recording and allows you to keep track of clip recording time while shooting the current clip. • Pressing the RESET button when the counter value is displayed resets the counter to 0. • The counter value indicates values in the range between 0:00.00 and 9:59.59 in 1-second steps. Time data overview ■ Time code You can switch between REC RUN and FREE RUN from the setup menu. (Page 141) FREE RUN: The time code advances constantly whether the camera-recorder is on or not just like time itself. Recording using a slave-locked time code input to the TC IN/OUT or DVCPRO/DV connectors is also possible. REC RUN: The time code advances only during recording. This will enable continuation of time codes in previously recorded clips and when the power is turned off or new P2 cards are inserted to continue recording. The following events will disrupt time code continuity. • When clips are deleted • When a 24P or 24PA frame rate is selected • When 24PN or 30PN (25PN) is selected • When a recording is interrupted by a REC WARNING or other abnormality ■ User bits • Two types of user bits are provided internally: (LTC UB: recorded as LTC, output via the TC IN/ OUT connector as LTC embedded in HD SDI) and VITC (in DVCPRO recorded in the VIDEO AUX area and output as VITC embedded in HD SDI). • LTC UB enables the recording of user settings, time, date, time codes and similar values, the frame rate data for camera capture and external input values (via TC IN/OUT or DVCPRO/DV connector input). • VITC user bits record the frame rate data of camera capture. • The user bits in clip metadata record the LTC UB value at the start of recording. 61
-
 1
1 -
2
-
3
-
4
-
5
-
6
-
7
-
8
-
9
-
10
-
11
-
12
-
13
-
14
-
15
-
16
-
17
-
18
-
19
-
20
-
21
-
22
-
23
-
24
-
25
-
26
-
27
-
28
-
29
-
30
-
31
-
32
-
33
-
34
-
35
-
36
-
37
-
38
-
39
-
40
-
41
-
42
-
43
-
44
-
45
-
46
-
47
-
48
-
49
-
50
-
51
-
52
-
53
-
54
-
55
-
 56
56 -
 57
57 -
 58
58 -
 59
59 -
 60
60 -
 61
61 -
 62
62 -
 63
63 -
 64
64 -
 65
65 -
 66
66 -
67
-
68
-
69
-
70
-
71
-
72
-
73
-
74
-
75
-
76
-
77
-
78
-
79
-
80
-
81
-
82
-
83
-
84
-
85
-
86
-
87
-
88
-
89
-
90
-
91
-
92
-
93
-
94
-
95
-
96
-
97
-
98
-
99
-
100
-
101
-
102
-
103
-
104
-
105
-
106
-
107
-
108
-
109
-
110
-
111
-
112
-
113
-
114
-
115
-
116
-
117
-
118
-
119
-
120
-
121
-
122
-
123
-
124
-
125
-
126
-
127
-
128
-
129
-
130
-
131
-
132
-
133
-
134
-
135
-
136
-
137
-
138
-
139
-
140
-
141
-
142
-
143
-
144
-
145
-
146
-
147
-
148
-
149
-
150
-
151
-
152
-
153
-
154
-
155
-
156
-
157
-
158
-
159
-
160
-
161
-
162
-
163
-
164
-
165
-
166
-
167
-
168
-
169
-
170
 |
 |