Panasonic PV20DF63 PV20DF63 User Guide - Page 7
Definition of Terms, Disc Handling, Initial Setup
 |
View all Panasonic PV20DF63 manuals
Add to My Manuals
Save this manual to your list of manuals |
Page 7 highlights
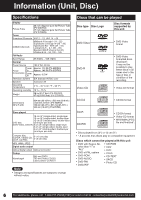
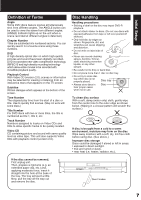
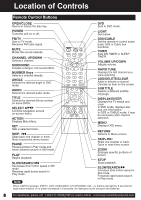
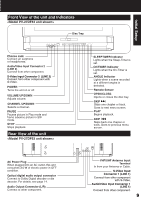
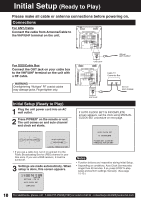
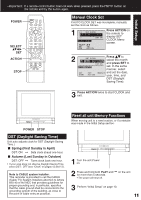
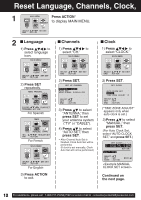
Initial Setup Definition of Terms Angle Some DVD discs feature scenes simultaneously shot from different angles. The ANGLE button can be used to view the scene from different angles. (ANGLE Indicator lights up on the unit when a scene recorded at different angles is detected.) Chapter Number Titles are subdivided into numbered sections. You can quickly search for a favorite scene using these numbers. DVD A high-density optical disc on which high-quality pictures and sound have been digitally recorded. DVD incorporates new video compression technology (MPEG II) and high-density recording technology which allow entire movies to be recorded with incredible playback quality. Playback Control With Video CD (version 2.0), scenes or information may be selected for viewing or listening from an interactive menu that appears on the TV screen. Subtitles Written dialogue which appears at the bottom of the screen. Time Number The elapsed play time from the start of a disc or title. Use to quickly find scenes. (May not work with some discs.) Title Number For DVD discs with two or more titles, the title is numbered as title 1, title 2, etc. Track Number Numbers assigned to tracks on Video CDs and CDs to allow specific tracks to be quickly located. Video CD CD containing picture and sound with same quality level as video tape. This unit also supports Video CDs with playback control (version 2.0). Disc Handling Handling precautions • Sticking a label on the disc may impair DVD-R playback. • Do not attach sticker to discs. (Do not use discs with exposed adhesive from tape or left over peeled-off stickers.) • Only hold disc by edges as shown. Fingerprints, dirt, and scratches can cause skipping and distortion. • Do not write on label side of disc. • Never use record cleaning sprays, benzine, thinner, static electricity prevention liquids, or any other solvent. • Be careful not to drop or bend disc. • Do not place more than 1 disc on disc tray. • Do not try to close disc tray when disc is not properly placed. Disc tray • Always store discs in Disc their proper cases when not in use. To clean disc surface With a soft, damp (water only) cloth, gently wipe from the center hole to the outer edge as shown below. (Wiping in a circular pattern will scratch the surface.) If disc is brought from a cold to a warm environment, moisture may form on the disc Wipe away moisture with a soft, dry, lint-free cloth before using disc. (See above.) Improper disc storage Discs could be damaged if stored or left in areas: • exposed to direct sunlight. • that are humid or dusty. • near heat (i.e. heater, radiator, etc.). If the disc cannot be removed, First unplug unit. Then, prepare a rigid wire (e.g. an extended paper clip, etc.) and, applying moderate force, insert it straight into the hole at the base of the tray. The tray will eject a little. Now, pull the tray all the way out and remove the disc. 7
-
 1
1 -
 2
2 -
 3
3 -
 4
4 -
 5
5 -
 6
6 -
 7
7 -
 8
8 -
 9
9 -
 10
10 -
 11
11 -
 12
12 -
13
-
14
-
15
-
16
-
17
-
18
-
19
-
20
-
21
-
22
-
23
-
24
-
25
-
26
-
27
-
28
-
29
-
30
-
31
-
32
-
33
-
34
-
35
-
36
-
37
-
38
-
39
-
40
-
41
-
42
-
43
-
44
-
45
-
46
-
47
-
48
-
49
-
50
-
51
-
52
-
53
-
54
-
55
-
56
-
57
-
58
-
59
-
60
-
61
-
62
-
63
-
64
-
65
-
66
-
67
-
68
 |
 |