Panasonic PVDV953D Digital Video Camera - Page 27
Optical Image Stabilizer Function, Fade In/out Functions
 |
View all Panasonic PVDV953D manuals
Add to My Manuals
Save this manual to your list of manuals |
Page 27 highlights
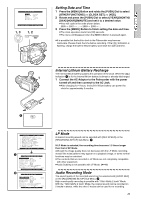
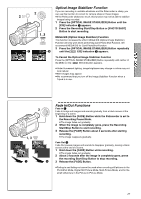
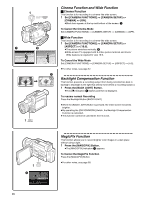
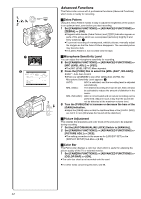
O O 2 PHOTO SHOT 1 EIS 2 FF ON MODE 1, 3 MEGA OPTICAL IMAGE STABILIZER 2 MEGA EIS Optical Image Stabilizer Function If you are recording in unstable situations and the Palmcorder is shaky, you can use this function to correct for camera shake in these images. ≥If the Palmcorder shakes too much, this function may not be able to stabilize images being recorded. 1 Press the [OPTICAL IMAGE STABILIZER] Button until the [EIS] Indication 1 appears. 2 Press the Recording Start/Stop Button or [PHOTO SHOT] Button to start recording. MEGA EIS (Optical Image Stabilizer) Function This function increases the effect. MEGA EIS (Optical Image Stabilizer) Function will only work when performing Card Photo Shot Function. We recommend MEGA EIS for Card PhotoShot Function. 3 Press the [OPTICAL IMAGE STABILIZER] Button repeatedly until the [ MEGA EIS] Indication 2 appears. To Cancel the Optical Image Stabilizer Function Press the [OPTICAL IMAGE STABILIZER] Button repeatedly until neither of the [EIS] nor the [ MEGA EIS] Indication appears. ≥Under fluorescent lighting, image brightness may change or colors may not look natural. ≥After-images may appear. ≥We recommend that you turn off the Image Stabilizer Function when a Tripod is in use. 2 FF ON MODE 1, 3 FADE 1 2 Fade In/Out Functions Fade In 1 Fade In brings out images and sounds gradually from a black screen at the beginning of a scene. 1 Hold down the [FADE] Button while the Palmcorder is set to the Recording Pause Mode. ≥The image fades out gradually. 2 When the image is completely gone, press the Recording Start/Stop Button to start recording. 3 Release the [FADE] Button about 3 seconds after starting recording. ≥The image reappears gradually. Fade Out 2 Fade Out causes images and sounds to disappear gradually, leaving a black screen at the end of a scene. 1 Hold down the [FADE] Button while recording. ≥The image fades out gradually. 2 About 3 seconds after the image is completely gone, press the recording Start/Stop Button to stop recording. 3 Release the [FADE] Button. ≥Fading-in and fading-out cannot be used when recording still pictures in the PhotoShot Mode, Digital Still Picture Mode, Multi-Picture Mode, and for the small still picture in the Picture-in-Picture Mode. 27
-
 1
1 -
2
-
3
-
4
-
5
-
6
-
7
-
8
-
9
-
10
-
11
-
12
-
13
-
14
-
15
-
16
-
17
-
18
-
19
-
20
-
21
-
 22
22 -
 23
23 -
 24
24 -
 25
25 -
 26
26 -
 27
27 -
 28
28 -
 29
29 -
 30
30 -
 31
31 -
 32
32 -
33
-
34
-
35
-
36
-
37
-
38
-
39
-
40
-
41
-
42
-
43
-
44
-
45
-
46
-
47
-
48
-
49
-
50
-
51
-
52
-
53
-
54
-
55
-
56
-
57
-
58
-
59
-
60
-
61
-
62
-
63
-
64
-
65
-
66
-
67
-
68
-
69
-
70
-
71
-
72
-
73
-
74
-
75
-
76
-
77
-
78
-
79
-
80
-
81
-
82
-
83
-
84
-
85
-
86
-
87
-
88
-
89
-
90
-
91
-
92
 |
 |
