Panasonic PVDV953D Digital Video Camera - Page 30
Manual Shutter Speed Adjustment, Manual Iris Adjustment (f Number), Manual Focus Adjustment
 |
View all Panasonic PVDV953D manuals
Add to My Manuals
Save this manual to your list of manuals |
Page 30 highlights
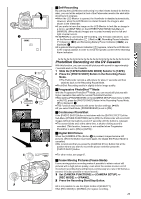
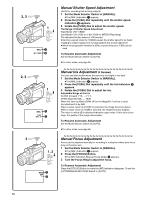
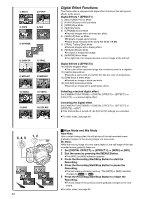
2, 3 SHUTTER/IRIS/ VOL/JOG PUSH 1 AUTO MANUAL AE LOCK FOCUS W.B. MNL 1 1/1000 2 2, 3 SHUTTER/IRIS/ VOL/JOG PUSH 1 AUTO MANUAL AE LOCK FOCUS W.B. MNL 1 1/60 F1.7 2 3 SHUTTER/IRIS/ VOL/JOG PUSH 1, 2 AUTO MANUAL AE LOCK FOCUS W.B. MNL 1 MF 2 Manual Shutter Speed Adjustment Useful for recording fast-moving subjects. 1 Set the Mode Selector Switch to [MANUAL]. ≥The [MNL] Indication 1 appears. 2 Press the [PUSH] Dial repeatedly until the shutter speed Indication 2 appears. 3 Rotate the [PUSH] Dial to adjust the shutter speed. The Range of Shutter Speed Adjustment Tape Mode 1/60-1/8000 Card Mode 1/30-1/500 (or 1/60-1/500 for MPEG4 Recording) The standard shutter speed is 1/60 second. Selecting a speed closer to [1/8000] causes the shutter speed to be faster, resulting in crisper captures of moving subjects but a lower light level. ≥When the progressive function is [ON], a speed only up to 1/500 can be used. To Resume Automatic Adjustment Set the Mode Selector Switch to [AUTO]. ≥For other notes, see page 68. Manual Iris Adjustment (F Number) You can use this function when the screen is too bright or too dark. 1 Set the Mode Selector Switch to [MANUAL]. ≥The [MNL] Indication 1 appears. 2 Press the [PUSH] Dial repeatedly until the Iris Indication 2 appears. 3 Rotate the [PUSH] Dial to adjust the iris. Adjustable Range of the Iris CLOSE (Closed), F16, ..., F1.7, OPEN (Opened) 0dB, ..., 18dB When the Gain up Mode [GAIN UP] or the MagicPix Function is used, Iris adjustment is by 6dB. When a value closer to [CLOSE] is selected, the image becomes darker. When a value closer to [18dB] is selected, the image becomes brighter. The value to which dB is attached indicates a gain value. If this value is too large, the quality of the image deteriorates. To Resume Automatic Adjustment Set the Mode Selector Switch to [AUTO]. ≥For other notes, see page 68. Manual Focus Adjustment Focus can be adjusted manually for recording in a situation where auto focus may not function well. 1 Set the Mode Selector Switch to [MANUAL]. ≥The [MNL] Indication 1 appears. 2 Press the [FOCUS] Button. ≥The [MF] Indication (Manual Focus Mode) 2 appears. 3 Turn the Focus Ring to adjust the focus. To Resume Automatic Adjustment Press the [FOCUS] Button to make the [MF] Indication disappear. Or set the [AUTO/MANUAL/AE LOCK] Switch to [AUTO]. 30
-
 1
1 -
2
-
3
-
4
-
5
-
6
-
7
-
8
-
9
-
10
-
11
-
12
-
13
-
14
-
15
-
16
-
17
-
18
-
19
-
20
-
21
-
22
-
23
-
24
-
 25
25 -
 26
26 -
 27
27 -
 28
28 -
 29
29 -
 30
30 -
 31
31 -
 32
32 -
 33
33 -
 34
34 -
 35
35 -
36
-
37
-
38
-
39
-
40
-
41
-
42
-
43
-
44
-
45
-
46
-
47
-
48
-
49
-
50
-
51
-
52
-
53
-
54
-
55
-
56
-
57
-
58
-
59
-
60
-
61
-
62
-
63
-
64
-
65
-
66
-
67
-
68
-
69
-
70
-
71
-
72
-
73
-
74
-
75
-
76
-
77
-
78
-
79
-
80
-
81
-
82
-
83
-
84
-
85
-
86
-
87
-
88
-
89
-
90
-
91
-
92
 |
 |
