Panasonic RR US570 Ic Recorder - Page 7
Setting the time
 |
UPC - 037988982301
View all Panasonic RR US570 manuals
Add to My Manuals
Save this manual to your list of manuals |
Page 7 highlights
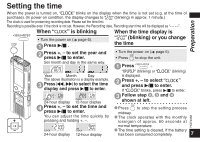
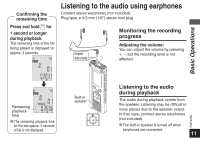
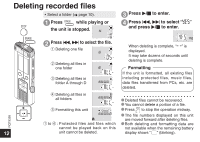
Setting the time Preparation When the power is turned on, " " blinks on the display when the time is not set (e.g. at the time of purchase). (In power-on condition, the display changes to " " (blinking) in approx. 1 minute.) The clock is used for preserving recording date. Please set the time first. Recording is possible even if the clock is not set. However, the Recording date, Recording start time will be displayed as " ". • MENU/ REPEAT STOP When " " is blinking • Turn the power on (➜ page 6). 1 Press q/g . When the time display is " " (blinking) or you change the time 2 Press +, - to set the press q/g to enter. year and • Turn the power on (➜ page 6). STOP • Press to stop the unit. Set month and day in the same way. 1 Press • MENU/ REPEAT . " " (blinking) or " " (blinking) Year Month Day The above illustration is a display example. 3 Press u, i to select the time display and press q/g to enter. is displayed. 2 Press +, - to select " " and press q/g to enter. If " " blinks, press q/g to enter. 24-hour display 12-hour display 4 Press +, - to set the press q/g to enter. time and You can adjust the time quickly by pressing and holding +, -. 3 Follow step 2 , 3 and 4 shown at left. STOP * Press to stop the setting process midway. * The clock operates with the monthly loss/gain of approx. 60 seconds at RQT9358 normal temperature. 24-hour display 12-hour display * The time setting is cleared, if the battery has been consumed completely. 7
-
 1
1 -
 2
2 -
 3
3 -
 4
4 -
 5
5 -
 6
6 -
 7
7 -
 8
8 -
 9
9 -
 10
10 -
 11
11 -
 12
12 -
13
-
14
-
15
-
16
-
17
-
18
-
19
-
20
-
21
-
22
-
23
-
24
-
25
-
26
-
27
-
28
-
29
-
30
-
31
-
32
-
33
-
34
-
35
-
36
-
37
-
38
-
39
-
40
-
41
-
42
-
43
-
44
 |
 |
