Panasonic RXD27 RXD27 User Guide - Page 9
Recording, Setting The Time - radio cassette cd
 |
View all Panasonic RXD27 manuals
Add to My Manuals
Save this manual to your list of manuals |
Page 9 highlights
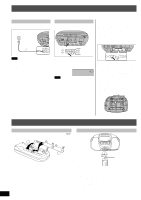
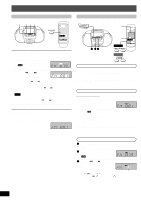
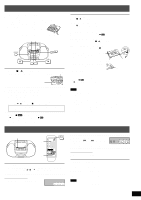
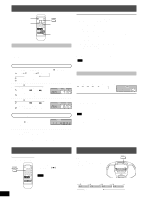
Recording You can record radio broadcasts or CDs. Before recording • This unit is suitable for recording normal tapes, but it cannot record onto high and metal position tapes to their full potential and prior recordings will not be erased correctly. • The recording level is set automatically. • Take up the leader tape before proceeding. Leader tape (Recording cannot be made.) 13 1 Press [ / STOP/EJECT ] to open the deck and load a cassette. Close deck by hand. Exposed tape facing upward Side to be recorded facing you ○ ○ ○ ○ ○ ○ ○ ○ ○ ○ ○ ○ ○ ○ ○ ○ ○ ○ ○ ○ ○ ○ ○ ○ ○ ○ ○ ○ ○ ○ ○ ○ 2 Select the source to be recorded. When recording radio broadcasts Tune in the station. (Perform steps 1-3 of "Normal tuning" on page 6.) When recording CDs Insert the CD to be recorded. (Perform steps 1 and 2 of "Normal play" on page 7.) Press [CD / ] and then [ ] to switch to CD mode. If you want to record programmed tracks, program desired tracks before proceeding to step 3. ○ ○ ○ ○ ○ ○ ○ ○ ○ ○ ○ ○ ○ ○ ○ ○ ○ ○ ○ ○ ○ ○ ○ ○ ○ ○ ○ ○ ○ ○ ○ ○ 3 Press [ ] to start recording. [ PLAY ] is also depressed with [ ]. Recording starts (one side only). The CD also starts playing if in CD mode. To stop recording Press [ / STOP/EJECT ]. (The CD does not stop.) To stop recording temporarily Press [ PAUSE ]. (The CD does not stop.) Press once again to resume recording. To record on the other side of the cassette Turn the cassette over and press [ ]. If the CD finishes before the cassette Recording continues. Press [ / STOP/EJECT ] to stop it. If the cassette finishes before the CD The CD continues playing. Press [ ] to stop it. Erase protection Side A Use a screwdriver or similar object to break out the tab. Tab for side B Tab for side A To re-record on a protected cassette Cover the hole with adhesive tape. Adhesive tape To erase a tape 1. Press [TAPE/OFF]. 2. Insert the cassette with the side to be erased facing towards you and the exposed tape facing up. 3. Press [ ]. [ PLAY ] is depressed at the same time. Note • Noise may be recorded if this unit is near a TV. Keep the units at least 1.5 meters apart. • Changes to volume and sound quality do not affect recording. • To prevent interruptions to recording, make sure there is constant AC power supply to the unit or replace the batteries. • While recording you cannot perform the following operations. - Switching play of the source (CD, Radio, Tape) - Switching the radio AM/FM frequency - CD skipping, searching Setting the time 1 2 · 4 3 ○ ○ ○ ○ ○ ○ ○ ○ ○ ○ ○ ○ ○ ○ ○ ○ ○ ○ ○ ○ ○ ○ ○ ○ ○ ○ ○ ○ ○ ○ ○ ○ 3 Within 10 seconds Press [- / ] or [ / +] to set the time. Press and hold to change the time faster. ○ ○ ○ ○ ○ ○ ○ ○ ○ ○ ○ ○ ○ ○ ○ ○ ○ ○ ○ ○ ○ ○ ○ ○ ○ ○ ○ ○ ○ ○ ○ ○ Remote control only 4 Press [CLOCK/TIMER ADJ]. This is a 12-hour clock. 1 Press [TUNER/BAND -AUTO PRESET] to turn the unit on. You can also use [CD / ], [ PLAY] to turn the unit on. ○ ○ ○ ○ ○ ○ ○ ○ ○ ○ ○ ○ ○ ○ ○ ○ ○ ○ ○ ○ ○ ○ ○ ○ ○ ○ ○ ○ ○ ○ ○ ○ Remote control only 2 Press [CLOCK/TIMER ADJ] once. To switch to clock display Press [DISPLAY]. Clock display ←→ Current display Displaying the clock temporarily Press [CLOCK/TIMER ADJ]. The clock is shown for about 10 seconds. Note The clock is accurate to within ± 60 seconds a month. Readjust if necessary. 9 RQTT0585
-
 1
1 -
2
-
3
-
 4
4 -
 5
5 -
 6
6 -
 7
7 -
 8
8 -
 9
9 -
 10
10 -
 11
11 -
 12
12
 |
 |
