Panasonic SC-HT40 SAHT40 User Guide - Page 18
OTHER SETTINGS, Setting descriptions, Changing the settings - overflow
 |
View all Panasonic SC-HT40 manuals
Add to My Manuals
Save this manual to your list of manuals |
Page 18 highlights
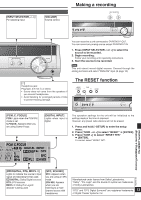
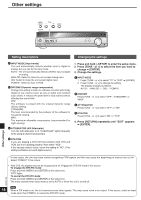
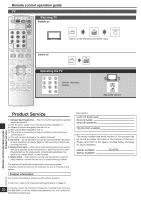
Other settings MENU TUNE SETUP RETURN ENTER POWER MENU TUNE SETUP RETURN MUSIC PORT SURROUND ENTER MUSIC INPUT SELECTOR VOLUME Setting descriptions Changing the settings A INPUT MODE (Input mode) This unit automatically detects whether input is digital or analog, but you can fix the input mode. AUTO: The unit automatically detects whether input is digital or analog. ANALOG: Select to make the unit accept analog input. DIG: Select to make the unit accept digital input. PCMFIX1: Select to input to PCM. B DRCOMP (Dynamic range compression) Change this setting to listen to software recorded with Dolby Digital at low volume (such as late at night) and maintain audio clarity. It reduces the peak level in loud scenes without affecting the sound field. OFF: The software is played with the original dynamic range (factory setting). STANDARD: The level recommended by the producer of the software for household viewing. MAX: The maximum allowable compression (recommended for night viewing). C ATTENUATOR (A/D Attenuator) Turn the A/D attenuator on if "OVERFLOW" lights frequently when using 2-channel analog input. D DTS-PCM If you are playing a DTS CD that contains both DTS and PCM, but it isn't playing properly, then select "YES". If this causes noise to occur, return the setting to "NO". (This setting is effective for each digital source.) 1. Press and hold [―SETUP] to enter the setup menu. 2. Press [TUNE - or +] to select the item you want to change ➡ [ENTER]. 3. Change the settings. A INPUT MODE 1. Press [TUNE - or +] to select "TV" or "DVR" ➡ [ENTER]. 2. Press [TUNE - or +] to change the setting. The display changes as follows: AUTO ↔ ANALOG ↔ DIG ↔ PCMFIX B DRCOMP Press [TUNE - or +] to select "OFF", "STANDARD" or "MAX". C ATTENUATOR Press [TUNE - or +] to select "OFF" or "ON". D DTS-PCM Press [TUNE - or +] to select "NO" or "YES". 4. Press [RETURN] repeatedly until "EXIT" appears ➡ [ENTER]. Other settings 1In rare cases, the unit may have trouble recognizing PCM signals and this may cause the beginnings of tracks to be cut off. Select "PCMFIX" if this occurs. • With DTS, the signals may not be recognized at all. Engage the DTS FIX mode if this occurs. To engage the DTS FIX mode: Press and hold [-MENU] and [ENTER] at the same time. "DTS" lights. To cancel the DTS FIX mode: Press and hold [-MENU] and [ENTER] at the same time. The mode cancels when input mode is set to AUTO or when the unit is turned off. RQTV0105 Note 18 When a FIX mode is on, the unit cannot process other signals. This may cause noise to be output. If this occurs, select an input mode other than PCMFIX, or cancel the DTS FIX mode.
-
 1
1 -
2
-
3
-
4
-
5
-
6
-
7
-
8
-
9
-
10
-
11
-
12
-
 13
13 -
 14
14 -
 15
15 -
 16
16 -
 17
17 -
 18
18 -
 19
19 -
 20
20 -
 21
21 -
 22
22 -
 23
23 -
24
 |
 |
