Panasonic SC-HT40 SAHT40 User Guide - Page 8
Settings, DISTANCE, DIG INPUT - surround sound
 |
View all Panasonic SC-HT40 manuals
Add to My Manuals
Save this manual to your list of manuals |
Page 8 highlights
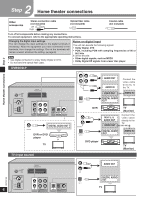
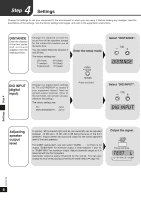
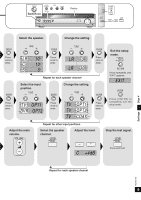
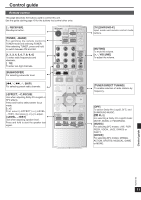
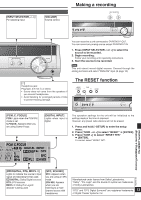
4 Step Settings Change the settings to suit your equipment to the environment in which you are using it. Before making any changes, read the descriptions of the settings, note the factory settings and ranges, and refer to the equipment's instructions. DISTANCE Enter the distance of the front, center and surround speakers from the seating position. Change the distance so that the sound from all the speakers (except for the subwoofer) reaches you at the same time. You can select distances between 3 and 30 feet. The factory settings are: LR (front): 10 ft (feet) C (center): 10 ft (feet) S (surround): 5 ft (feet) Enter the setup mode. MENU SETUP DIG INPUT (digital input) Change the digital input settings for TV or DVR/DVD-P to coaxial if your equipment doesn't have an optical output terminal. (One of the terminals will remain unused, whatever the setting.) The factory settings are: TV: OPT1 DVR (DVR/DVD-P): OPT2 RETURN Press and hold. Select "DISTANCE". TUNE D I S TA N C E Select "DIG INPUT". TUNE DIG INPUT Adjusting speaker output level C (center), SR (surround right) and SL (surround left) can be adjusted between -10 dB and +10 dB, with 0 dB being the level of the front speakers. Adjust center and surround output to the same apparent level of the front speakers. For SUBW (subwoofer), you can select "SUBW - - -" so there is no output, "SUBW MIN" for minimum output, a level between 1 and 19, or "SUBW MAX" for maximum output. Adjust subwoofer output so it is balanced with the front speakers. Subwoofer output is easily influenced by the source. You can also change its level while playing something for better effect (➡ page 16). Output the signal. -LEVEL TEST Press and hold. TEST L L C R SR SL SUBW Step 4 Settings RQTV0105 8
-
 1
1 -
2
-
 3
3 -
 4
4 -
 5
5 -
 6
6 -
 7
7 -
 8
8 -
 9
9 -
 10
10 -
 11
11 -
 12
12 -
 13
13 -
14
-
15
-
16
-
17
-
18
-
19
-
20
-
21
-
22
-
23
-
24
 |
 |
