Panasonic SC-PT464 Dvd Home Theater Sound System - Page 7
Audio and video connections, VIERA Link HDAVI Control - dvd home theater
 |
UPC - 037988984220
View all Panasonic SC-PT464 manuals
Add to My Manuals
Save this manual to your list of manuals |
Page 7 highlights
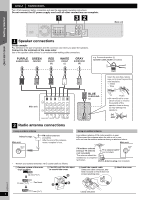
3 Audio and video connections Basic setup example Getting Started Quick Start Guide To your cable TV service or TV antenna RF cable (not included) Set top box (STB) or VCR (not included) Audio cable (not included) Y AUX L PB R PR You can enjoy the audio from your TV, cable or satellite STB, or your VCR through this home theater system by connecting to the AUX terminal. Select "AUX" as the source (B 12). TV (not included) Video cable Refer to the operating instructions for the TV, cable or satellite (included) STB, or VCR for the settings necessary to output its audio from the AUDIO OUT terminal to your home theater system. COMPONENT VIDEO OUT VIDEO OUT Main unit Other video connections TV terminal AV IN COMPONENT VIDEO IN Y PB PR All Panasonic TVs that have 480p input connectors are compatible. Consult the manufacturer if you have another brand of TV. Cable required (not included) HDMI cable [Note] ≥ Non-HDMI-compliant cables cannot be utilized. ≥ It is recommended that you use Panasonic's HDMI cable. Recommended part number: RP-CDHG15 (1.5 m/4.9 ft), RP-CDHG30 (3.0 m/9.8 ft), RP-CDHG50 (5.0 m/16.4 ft), etc. Video cables Main unit terminal [\\\\\\\\\\\HDMI\\\\\\\\\\\] AV OUT [COMPONENT\VIDEO] Y PB PR COMPONENT VIDEO OUT ≥ Connect to terminals of the same color. Features This connection provides the best picture quality. ≥ Set "VIDEO PRIORITY" to "ON" (B 25, HDMI menu). ≥ Set "VIDEO FORMAT" in Menu 4 (HDMI) (B 19). VIERA Link "HDAVI Control" If your Panasonic TV is VIERA Link compatible, you can operate your TV synchronising with home theater operations or vice versa (B 20, Using the VIERA Link "HDAVI ControlTM"). ≥ Make the extra audio connection (B above) when you use VIERA Link "HDAVI Control" function. This connection provides a much purer picture than the VIDEO OUT terminal. ≥ After making this connection, select "DARKER" from the "BLACK LEVEL" in the VIDEO menu (B 24). To enjoy progressive video ≥ Connect to a progressive output compatible TV. - Set "VIDEO OUT (I/P)" in VIDEO menu to "PROGRESSIVE" and then follow the instructions on the menu screen (B 24). Other audio connection TV or external equipment terminal OPTICAL OUT Cable required (not included) ≥ Do not bend sharply when connecting. Optical digital audio cable Main unit terminal Features [\\\\\\OPTICAL\IN\\\\\\] OPTICAL IN This is the preferred connection for best sound and true surround sound. This unit can decode the surround signals received from your TV, cable or satellite STB. Refer to the operating instructions for the TV, cable or satellite STB for the settings necessary to output its audio from the digital audio output to your home theater system. Only Dolby Digital and PCM can be played with this connection. ≥ After making this connection, make settings to suit the type of audio from your digital equipment (B 12). [Note] ≥ Do not make the video connections through the VCR. Due to copy guard protection, the picture may not be displayed properly. ≥ Only one video connection is required. Choose one of the video connections above depending on your TV. ≥ If you have various sound sources (such as Blu-ray player, DVD recorder, VCR, etc.), connect them to the available inputs on the TV and the TV output should then be connected to the AUX or OPTICAL IN terminal of the main unit. RQTX0217 7
-
 1
1 -
 2
2 -
 3
3 -
 4
4 -
 5
5 -
 6
6 -
 7
7 -
 8
8 -
 9
9 -
 10
10 -
 11
11 -
 12
12 -
13
-
14
-
15
-
16
-
17
-
18
-
19
-
20
-
21
-
22
-
23
-
24
-
25
-
26
-
27
-
28
-
29
-
30
-
31
-
32
-
33
-
34
-
35
-
36
 |
 |
