Panasonic SCEN35 SCEN33 User Guide - Page 3
Discs operations, Connections - sc en35e s
 |
View all Panasonic SCEN35 manuals
Add to My Manuals
Save this manual to your list of manuals |
Page 3 highlights
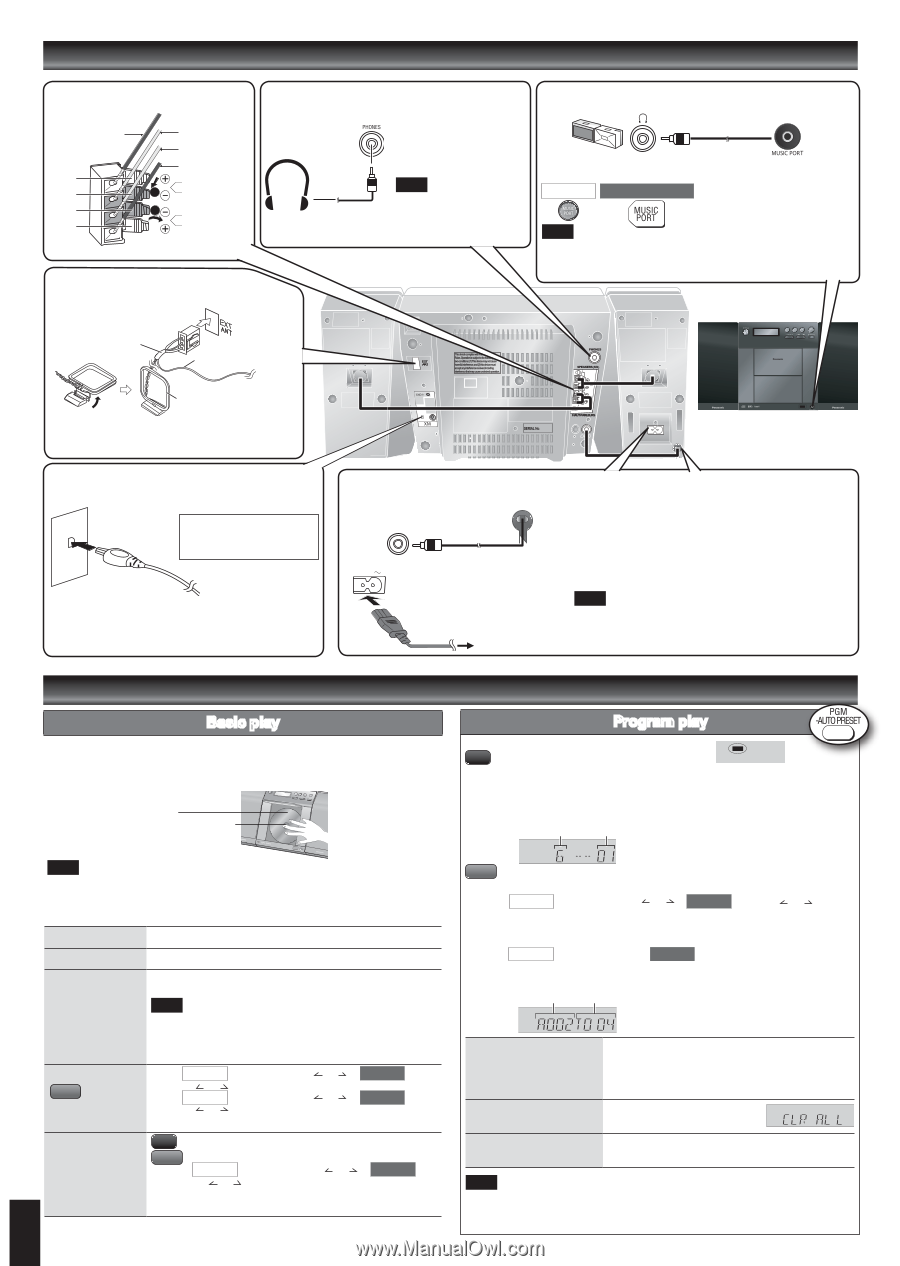
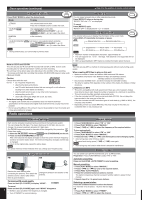
Connections 1. Speakers Copper (+) Red Black Black Red Silver (-) Silver (-) Copper (+) 2 L 1 R Headphones (not included) 2. FM/AM antenna Stand the antenna up on its base. ➡ Page 2 for the position of remote control and main unit buttons. Reduce the volume level and connect the headphones. Plug type: 3.5 mm (1/8") stereo. Note To prevent hearing damage, avoid listening for prolonged periods of time . Portable audio equipment (Cords and equipment not included) Portable audio player Plug type: Use 3.5 mm (1/8") stereo MAIN UNIT REMOTE CONTROL ➡ Start Playback from the Portable audio source. Note • Adjust the volume and sound quality of this unit and the other equipment. • For details, refer to the instruction manual of the other equipment. Taped part FM antenna AM antenna L R SSAA--EENN3355 Unplug the antenna connector by holding the taped part. 3. Connect the XM Connect & Play, or XM Mini-Tuner and Home Dock (includes home antenna). (both not included) XM Connect & Play or XM Mini-Tuner and Home Dock (includes home antenna) To prevent interference with wireless equipment, place the antenna away from other equipment that emits radio waves (such as radio equipment and microwave ovens). Refer to page 5 for optimizing the reception. 4. AC power supply cord Connect the DC in cord from left speaker to main set. Connect the AC power supply cord. AC IN Connect the AC power supply cord after all other connections are complete. To household AC outlet Conserving power The unit consumes 2.0 W even it is turned off with [POWER 8]. To save power when the unit is not to be used for a long time, unplug it from the household AC outlet. Remember to reset the radio stations and any other memory items before using the unit again. Note If the unit is left unplugged for longer than approximately two weeks, all settings will revert to the factory settings. Discs operations Basic play Press [POWER 8] to turn the unit on. Press [; OPEN/CLOSE] to open the CD lid and then set the CD in place. Press [; OPEN/CLOSE] again to close the lid. Keep fingers away from the CD lid when it is closing to avoid possible minor injury. Label must face outward. Press until you hear it click into place. Press [CD q/h] to start play. Adjust the volume. Note • Be sure to press the [; OPEN/CLOSE] button to open and close the CD lid. • Damage may occur if the lid is forced closed. • During standby, if the CD is ready in the unit, the unit comes on and play begins. (One touch play) Stop Press [g]. Pause Press [CD q/h]. Press again to resume play. Skip/Search Press [2/u] or [1/i] to skip/ Press and hold [2/u] or [1/i] to search. Note • You can search during play or while paused. • You cannot search through MP3 files. • You can only search within the current track during program play, one track repeat, and random play. Skip album MP3 Press SC-EN35 [XM CATEGORY or ] / SC-EN33 [ALBUM or ] in the play mode. Press SC-EN35 [XM CATEGORY or ] / SC-EN33 [ALBUM or ] once and then the numbered buttons in the stop mode. Direct access play CD Press the numbered buttons to select the desired track. (Play starts with the MP3 track you select.) Press SC-EN35 [XM CATEGORY or ] / SC-EN33 [ALBUM or ] to select the album. Press [1/i] once and then press the numbered buttons 3 to select the desired track. Program play The function allows you to program up to 24 tracks. PGM CD Press [PGM, -AUTO PRESET] while stopped. Press the numbered buttons to select tracks. (Maximum 24 tracks) Repeat this step to program other tracks. Press [CD q/h] to start play. Track number Program number MP3 Press [PGM, -AUTO PRESET] while stopped. Press SC-EN35 [XM CATEGORY or ] / SC-EN33 [ALBUM or ] to select your desired album. Press [1/i] once and then press the numbered buttons to select tracks. (Maximum 24 tracks) Press SC-EN35 [ALBUM ENTER] / SC-EN33 [ENTER]. Repeat step 2 to 4 to program other tracks. Press [CD q/h] to start play. Album number Track number g Confirm a programmed track Press [2/u] or [1/i] when "PGM" is displayed in the stop mode. To check while programming, press [PGM, -AUTO PRESET] twice after "PGM" appears, then press [2/u] or [1/i]. g Delete all programs Press [CLEAR] in the stop mode. "CLR ALL" is displayed. g Cancel program mode Press [PGM, -AUTO PRESET] in the stop mode to clear "PGM" indicator from the display. Note Program contents are stored in the unit's memory even after changing to a different function or turning the unit off. All program contents are erased by pressing [CLEAR] or by opening the CD lid.
-
 1
1 -
 2
2 -
 3
3 -
 4
4 -
 5
5 -
 6
6 -
 7
7 -
 8
8
 |
 |