Panasonic SL-1200MK2PK Operating Instructions - Page 6
Connecting To An Audio Mixer (not Included), Installation, Preparatory Adjustments
 |
View all Panasonic SL-1200MK2PK manuals
Add to My Manuals
Save this manual to your list of manuals |
Page 6 highlights
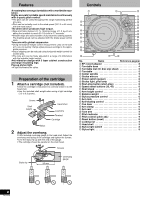
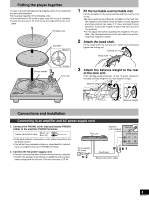
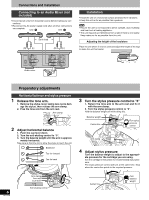
Connections and installation Connecting to an Audio Mixer (not included) •Disconnect all units from the power source before making any con- nections. •Reconnect the AC power supply cord after all other connections are complete. Unit Unit Earth lead Installation •Install the unit on a horizontal surface protected from vibrations. •Keep this unit as far as possible from speakers. •Ensure the unit is not exposed to direct sunlight, dust, humidity, and heat from a heating appliance. •This unit may pick up interference from a radio if there is one nearby. Keep radios as far as possible from this unit. Adjusting the height of the insulators Place the unit where it is to be used and adjust the height of the legs to make the unit horizontal. ;; Audio mixer ;; Preparatory adjustments Horizontal balance and stylus pressure 1 Release the tone arm. 1. Remove the stylus cover, taking care not to damage the stylus, then release the arm clamp. 2. Free the tone arm from the arm rest. Arm clamp 2 Adjust horizontal balance 1. Push the cue lever down. 2. Turn the anti-skating control to "0". 3. Turn the balance weight until the arm is approxi- mately horizontal. Take care at this time not to allow the stylus to touch the unit. Balanced Too far forward Too far back 3 Turn the stylus pressure control to "0" 1. Return the tone arm to the arm rest and fix it with the arm clamp. 2. Turn the stylus pressure control to "0". Hold the balance weight still while doing this. Balance weight Center line Turn stylus pressure control Arm clamp 4 Adjust stylus pressure Turn the balance weight to adjust to the appropriate pressure for the cartridge you are using. See the cartridge's instructions for recommended stylus pressure. The stylus pressure control will turn at the same time. Stop when the center line points to the required pressure. 6 RQT7018 Arm clamp Arm rest Cue lever Anti-skating control Center line Turn balance weight
-
 1
1 -
 2
2 -
 3
3 -
 4
4 -
 5
5 -
 6
6 -
 7
7 -
 8
8 -
 9
9 -
 10
10 -
 11
11 -
 12
12
 |
 |
