Panasonic TC-26LX60 26" Lcd Tv - English/ Spanish - Page 5
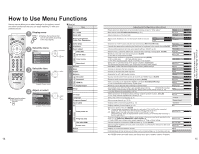
Identifying Controls, First Time Setup - remote
 |
UPC - 037988108244
View all Panasonic TC-26LX60 manuals
Add to My Manuals
Save this manual to your list of manuals |
Page 5 highlights
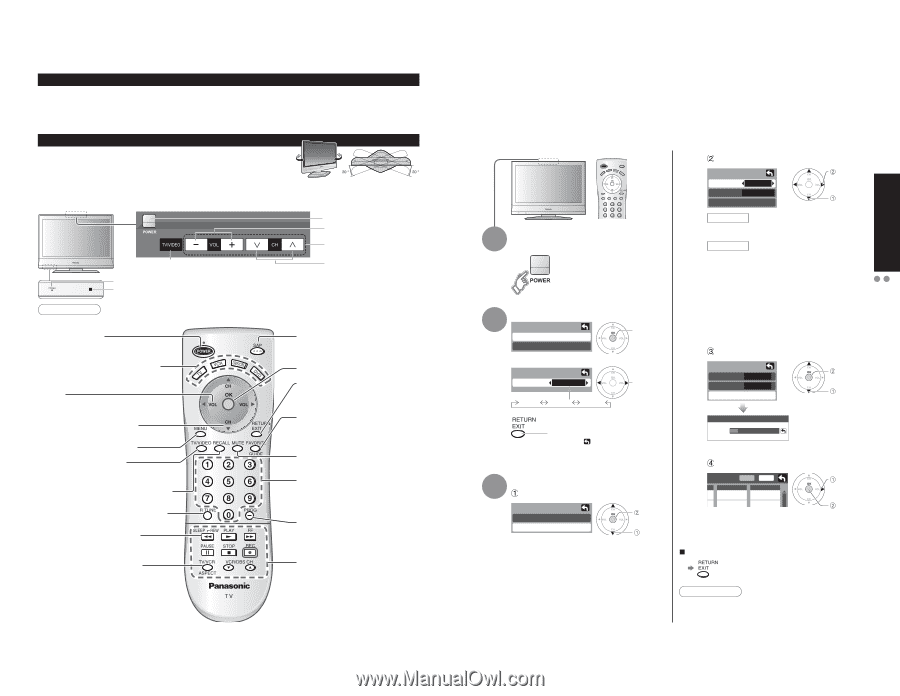
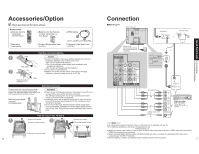
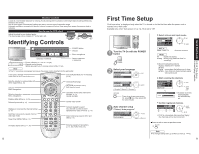
Receiver Location Locate at a comfortable distance for viewing. Avoid placing where sunlight or other bright light (including reflections) will fall on the screen. Use of some types of fluorescent lighting can reduce remote control transmitter range. Adequate ventilation is essential to prevent internal component failure. Keep away from areas of excessive heat or moisture. How to use the LCD stand Adjust the stand to your desired angle. The stand angle can be rotated 20 ° to the right / left. Identifying Controls POWER button Volume Menu navigations Switches TV/VIDEO Power indicator (on : red, off : no light) Remote control sensor Within about 23 feet (7 meters) in front of the TV set. Selects channels in sequence Note •The TV consumes some power as long as the power cord is inserted into the wall outlet. Turns power On/Off (used when the unit Power button is on) Selects Audio Mode for TV Viewing (p. 10) Sets the remote to communicate with other equipment (p. 20) Volume Menu navigations Selects channels in sequence Menu navigations Displays Main Menu (p. 14-15) Selects input mode (p. 12) Selects/OK/Change RETURN (to previous menu) Exit (from the menu) Operates the Favorite channel list function. (p. 11) GUIDE for DBS Sound mute On/Off Displays or removes the channel banner (p. 10) Switches to previously viewed channel and input mode. Sleep timer (MINUTES) (p. 10) Numeric keypad to select any channel or press to enter alphanumeric input in menus. (p. 10) Direct channel access for DTV and DBS (p. 10) Changes aspect ratio (p. 11, 40) External equipment operations (p. 12, 36) (VCRs, DVDs, etc.) 8 First Time Setup "First time setup" is displayed only when the TV is turned on for the first time after the power cord is inserted into a wall outlet. Available only when "Auto power on" (p. 14-15) is set to "Off". 1 Turn the TV On with the POWER button 2 Select your language First time setup Language Auto program Language Language English English Español Français next select Press to go to previous screen. Or, select icon, then press OK for same results. 3 Auto channel setup Select "Auto program" First time setup Language Auto program next select Select antenna and input modes Auto program ANT In Cable Mode All Start scan set select ANT In Cable: Cable TV Antenna: Antenna Mode All : digital and analog Analog : analog only (Reduces time for scanning) •About broadcasting systems Analog : traditional TV system (NTSC) Digital : new system that allows you to view (ATSC) more channels featuring high-quality video and sound Start scanning the channels Auto program ANT In Cable Mode All Start scan Now scanning analog channel ... Progress start select "Start scan" •Available channels (analog/digital) are automatically set. Confirm registered channels Edit Favorite Apply Add select "Apply" - - - No 2 Yes ok •If OK is not pressed after selecting "Apply", the channels will not be memorized. Ŷ Press to exit or return to previous screen Note •To change setting later, go to Menu screen (p. 14-15) 9 Quick Start Guide First Time Setup Identifying Controls
-
 1
1 -
 2
2 -
 3
3 -
 4
4 -
 5
5 -
 6
6 -
 7
7 -
 8
8 -
 9
9 -
 10
10 -
 11
11 -
12
-
13
-
14
-
15
-
16
-
17
-
18
-
19
-
20
-
21
-
22
-
23
-
24
-
25
-
26
 |
 |