Panasonic TCP50ST30 Owners Manual - Page 16
Label the inputs for easy identification Label inputs, Con Network settings - wireless
 |
UPC - 885170043510
View all Panasonic TCP50ST30 manuals
Add to My Manuals
Save this manual to your list of manuals |
Page 16 highlights
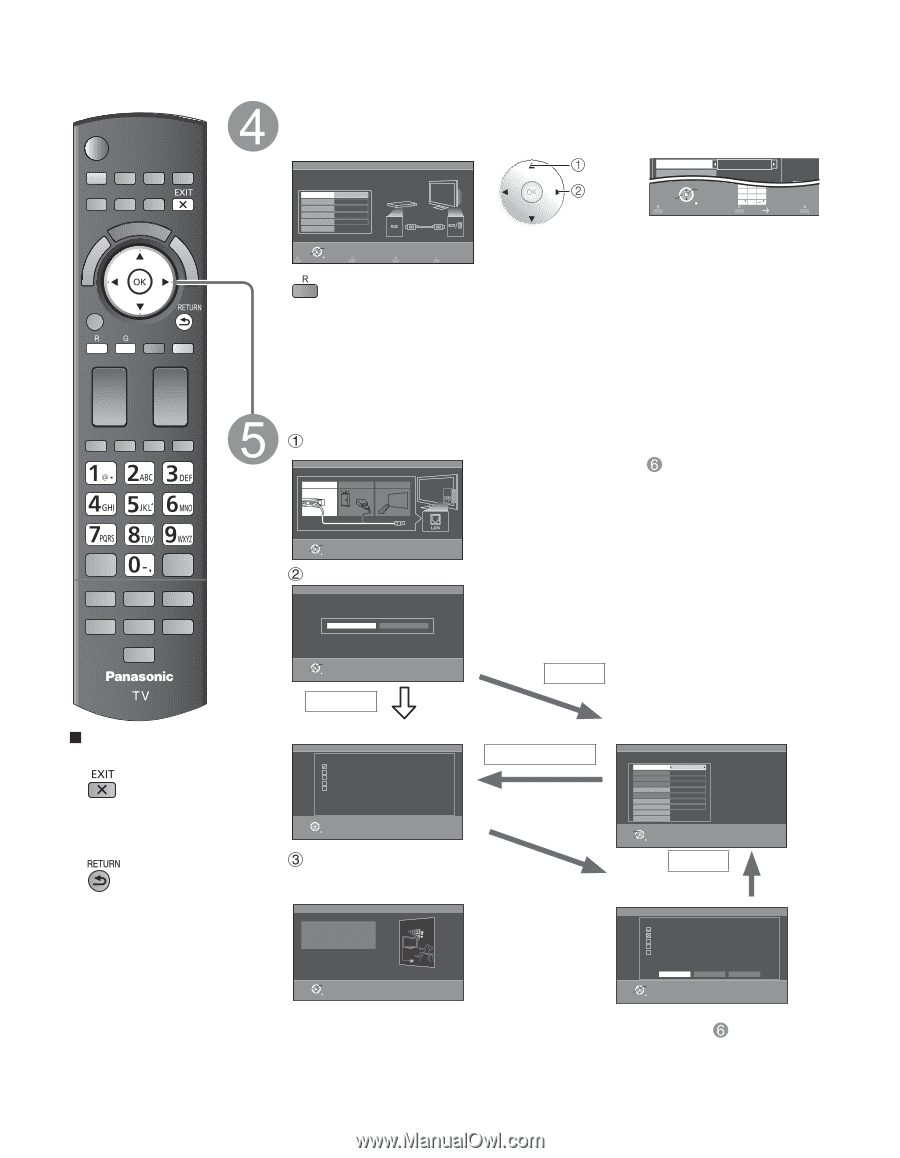
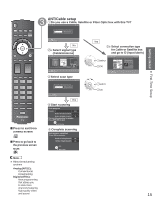
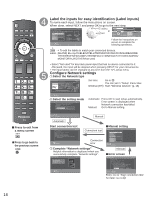
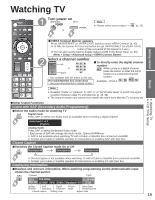
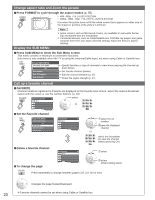
Press to exit from a menu screen ■Press to go back to the previous screen Label the inputs for easy identification (Label inputs) To name each input, follow the instructions on screen. When done, select NEXT and press OK to go to the next step. Label inputs What is connected to HDMI 1 ? For your convenience, you may name each input for easy identification. The labels will be shown in the "Input select" menu. HDMI 1 HDMI 2 HDMI 3 Component Video Next OK Select Return Customize label Step 5 of 7 HDMI select or set Video Next Select GGAAMMEE OK RETURN 1 @. 2 ABC 3 DEF 4 GHI 5 JKL 6MNO 7PQRS 8 TUV 9WXYZ LAST 0 - , ABC abc Follow the instructions on screen to complete the following operations. --> To edit the labels to match your connected devices. Label: [BLANK] Blu-ray/CABLE/SATELLITE/DVD/DVD REC/DVR/GAME/HOME THTR/RECEIVER/COMPUTER/MEDIA CTR/MEDIA EXT/VCR/CAMERA/ MONITOR/AUX/OTHER/Not used • Select "Not used" for any back-panel input that has no device connected to it. Afterward, the input will be skipped when pressing INPUT, for your convenience. • The input labels can be changed at any time from the TV's setup menu Configure Network settings Select the Network type Network settings Select Ethernet cable of wireless network. Ethernet cable Wireless(Wifi) Set later Step 6 of 7 Set later: Go to You can set in "Setup" menu later. Wireless (WiFi): Start "Wireless network" (p. 18) Select OK Return Select the setting mode Network settings Step 6 of 7 Checks for proper network connection, settings and communication to the Internet and server automatically. Automatic Manual Automatic: Press OK to start setup automatically. Error screen is displayed when Network connection has failed. Manual: Go to Manual setting. Select OK RETURN Manual Automatic Start connection test Network settings Step 6 of 7 Connection test Check Ethernet cable connection Validate IP address Check for IP address duplication Check connection to the Internet Check communication with VIERA Connect server. Test in progress... RETURN Connection test Connection error Complete "Network settings" Helpful information is displayed when you successfully complete "Network settings". Network settings Step 6 of 7 Network settings are complete. You can use VIERA Connect. VIERA Connect lets you enjoy Internet contents on your VIERA TV. OK Return ■Manual setting Network settings Configure settings of the network connection. IP setting mode Automatic IP address 192.168.0.4 Subnet mask 255.255.255.0 Default gateway 192.168.0.1 DNS setting mode Automatic DNS 192.168.0.1 Proxy address Proxy port Connect test Mac address 00-00-aa-cc-33-ab Select Change RETURN Manual Step 6 of 7 ■Error screen Network settings Step 6 of 7 Connection test Check Ethernet cable connection Validate IP address Check for IP address duplication Check connection to the Internet Check communication with VIERA Connect server. Connection to local network (router) failed. Ensure wireless network availability Retry Manual Set later Select OK RETURN Retry: Go to "Start connection test" Set later: Go to 16
-
 1
1 -
2
-
3
-
4
-
5
-
6
-
7
-
8
-
9
-
10
-
 11
11 -
 12
12 -
 13
13 -
 14
14 -
 15
15 -
 16
16 -
 17
17 -
 18
18 -
 19
19 -
 20
20 -
 21
21 -
22
-
23
-
24
-
25
-
26
-
27
-
28
-
29
-
30
-
31
-
32
-
33
-
34
-
35
-
36
-
37
-
38
-
39
-
40
-
41
-
42
-
43
-
44
-
45
-
46
-
47
-
48
-
49
-
50
-
51
-
52
-
53
-
54
-
55
-
56
-
57
-
58
-
59
-
60
-
61
-
62
-
63
-
64
-
65
-
66
-
67
-
68
-
69
-
70
-
71
-
72
 |
 |