Panasonic TH-85PB1U Operating Instructions - Page 46
Setup for Portrait
 |
View all Panasonic TH-85PB1U manuals
Add to My Manuals
Save this manual to your list of manuals |
Page 46 highlights
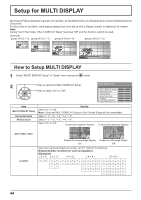
Setup for Portrait Divide an input image into 3 parts, and display one of them to a plasma display which is set vertically. The image will be enlarged 3 times and rotated 90-degree. (Example) Notes: • During Touch Pen mode, "Portrait Setup" becomes "Off" and this function cannot be used. • When using the Portrait function with displays set vertically, "Display orientation" in Setup menu has to be set to "Portrait" (see page 43). • Turn down the power switch for the downward direction when you set Display vertically. How to setup Portrait 1 Select "Portrait Setup" in "Setup" menu and press button. 2 Press to select the Portrait Setup. Press to select "On" or "Off". Note: If you set Portrait Setup to On, MULTI DISPLAY Setup will be unavailable. 3 Press to select Seam hides video. Press to select "Off" , "On". To hide joints between displays. To show joints between displays. Portrait Setup Portrait Setup Seam hides video Viewing Area Location Video Wall Uniformity Portrait Setup Portrait Setup Seam hides video Viewing Area Location Video Wall Uniformity Off Off 16 : 9 1 Off Off Off 16 : 9 1 Off Suitable for moving image display. Suitable for still image display. On Off 46
-
 1
1 -
2
-
3
-
4
-
5
-
6
-
7
-
8
-
9
-
10
-
11
-
12
-
13
-
14
-
15
-
16
-
17
-
18
-
19
-
20
-
21
-
22
-
23
-
24
-
25
-
26
-
27
-
28
-
29
-
30
-
31
-
32
-
33
-
34
-
35
-
36
-
37
-
38
-
39
-
40
-
 41
41 -
 42
42 -
 43
43 -
 44
44 -
 45
45 -
 46
46 -
 47
47 -
 48
48 -
 49
49 -
 50
50 -
 51
51 -
52
-
53
-
54
-
55
-
56
-
57
-
58
-
59
-
60
-
61
-
62
-
63
-
64
-
65
 |
 |
