Panasonic WJND400 WJND400 User Guide - Page 11
[Control] button, Search] button
 |
View all Panasonic WJND400 manuals
Add to My Manuals
Save this manual to your list of manuals |
Page 11 highlights
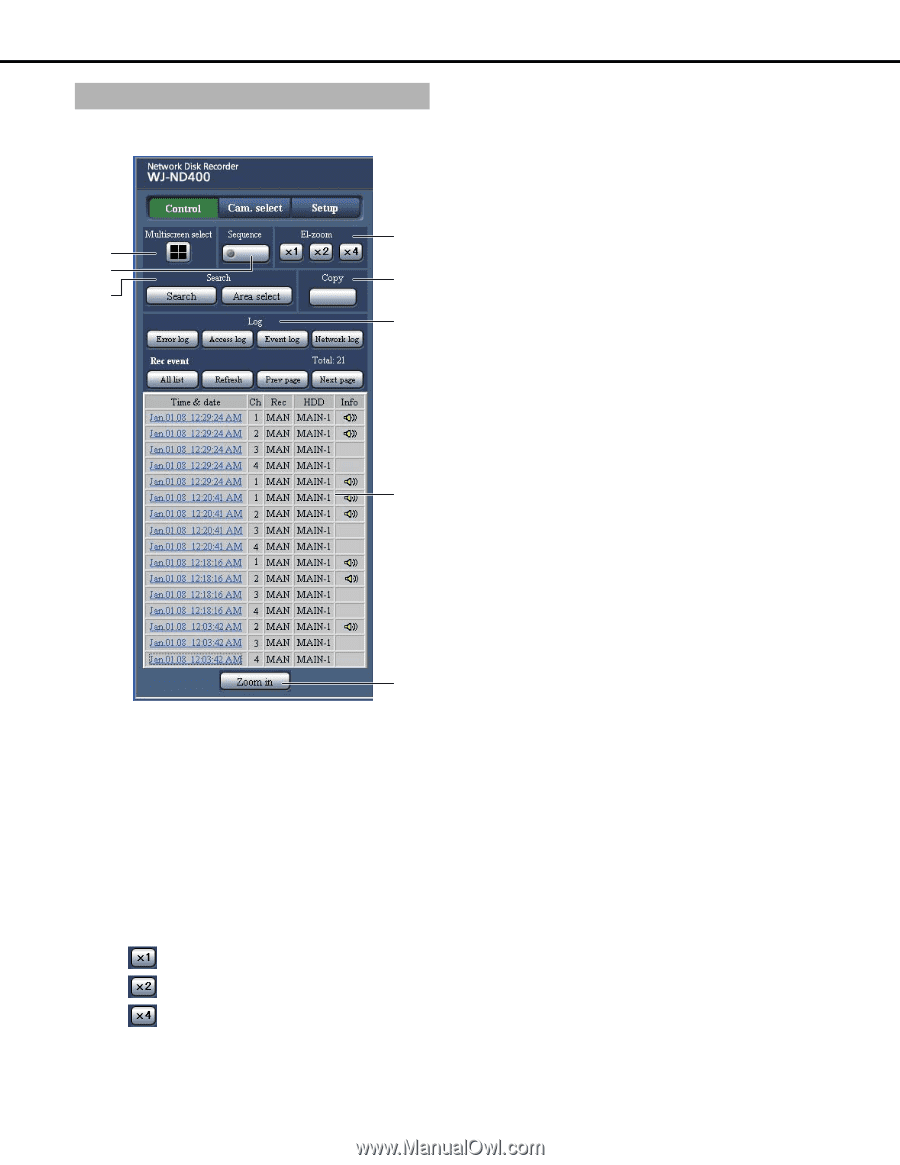
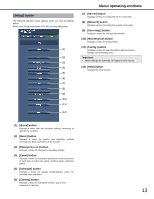
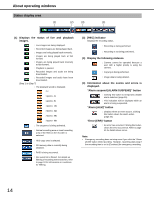
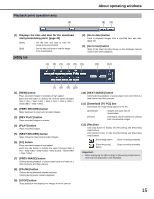
[Control] button The following operation panel appears when you click the [Control] button. (3) (1) (2) (5) (4) (6) (7) (8) (1) [Multiscreen select] box Displays multiple images from up to 4 cameras at the same time. Switches between the four screens with each clicking the button following the preset camera combination (refer to the Setup Instructions (PDF file)). (2) [Sequence] box Switches the camera images automatically in a preset sequence. The button indicator lights green during sequence (refer to the Setup Instructions (PDF file)). (3) [El-zoom] box Displays the camera image at the magnification of the button clicked. : 1x : 2x : 4x About operating windows (4) [Search] box [Search] button Searches for recorded images. The search results are shown on the rec event list window (page 24, page 25). [Area select] button Selects disk to play or search (page 26). (5) [Copy] box Copies recorded images into the Copy area of the HDD. (6) [Log] box The history is shown on the rec event list window. [Error log] button Displays a log of the errors that occur. [Access log] button Displays the log in/log out time and date, the user name or IP address. [Event log] button Displays the event log (when it occurred and a description). [Network log] button Displays a log of the problems that occur on the network. (7) Rec event list Number of events Displays the total number of events in a list. If there are more than 10 000 events, [>10000] is displayed. [All list] button Removes any conditions and all rec events are listed. [Refresh] button Updates the display to the most recent status. [Prev page] button Displays the previous page of the list. [Next page] button Displays the next page of the list. [Time & date] Displays the time and date. [Ch] Displays the channel of the recorded data. [Rec] Displays the recording mode (page 23). [HDD] Displays the number of the disk where data is stored. [Info] An icon is displayed on the image when audio is available. (8) [Zoom in] button Enlarges the display of live and recorded images. 11
-
 1
1 -
2
-
3
-
4
-
5
-
 6
6 -
 7
7 -
 8
8 -
 9
9 -
 10
10 -
 11
11 -
 12
12 -
 13
13 -
 14
14 -
 15
15 -
 16
16 -
17
-
18
-
19
-
20
-
21
-
22
-
23
-
24
-
25
-
26
-
27
-
28
-
29
-
30
-
31
-
32
-
33
-
34
-
35
-
36
-
37
-
38
-
39
-
40
-
41
-
42
-
43
-
44
-
45
-
46
-
47
-
48
-
49
-
50
-
51
-
52
-
53
-
54
-
55
-
56
-
57
-
58
-
59
-
60
-
61
-
62
-
63
-
64
-
65
-
66
-
67
-
68
-
69
 |
 |